Monday, June 27

rhubarb & strawberry buckle (an ode to rhubarb)


Rhubarb. Oh, rhubarb. I tell people pumpkin is my favourite vegetable: your ambiguous nature means I constantly forget about you, but how I love you so. 

My sister and I had a wonderful childhood in that we always ate such a beautiful variety of fresh food, but I don't remember rhubarb as a part of this. It's one of the few foods my mother doesn't eat, so it wasn't until I was in my teenage years that I remember first trying it: in a cosy restaurant in the Gold Coast hinterland, as part of rhubarb crumble swimming in homemade custard. Love. at. first. taste. So now, rhubarb and me, we're making up for lost time. 

This 'buckle' is similar to a coffee or crumble cake, requiring the crunchy toping to be frozen before baking, ensuring it doesn't just melt and get absorbed into the cake mixture. It's incredibly easy to make, but has a slow cooking time, so is perfect to make on a cold Sunday afternoon. 


Ingredients
Recipe from June issue of AGT

250 gms each of strawberries and rhubarb, roughly chopped
110 gms each of caster sugar and rapadura* sugar
160 gms butter, at room temperature
2 eggs
220 gms plain flour
40 gms hazelnut meal
1 tsp baking powder
1/2 tsp bicarbonate of soda
2 tsps each of ground cinnamon and ginger
165 mls buttermilk

For hazelnut topping:
80 gms rapadura* sugar
40 gms plain flour
40 gms hazelnuts, roughly chopped
20 gms butter, melted

*Use dark brown sugar if you can't find rapadura sugar. 


Preheat the oven to 170C. Grease a 24cm round cake tin, and line with baking paper. 

For the crunchy hazelnut topping, combine ingredients in a small bowl. Freeze until required - this will stop the topping from melting into the cake during baking. 

Combine rhubarb and strawberry in a bowl with 1 tbsp of each sugar and set aside.


Beat butter and remaining sugars in the bowl of an electric mixer for about 5 minutes, or until light and fluffy. Scrape down the sides of the bowl, then with motor running, add eggs one at a time, beating well after each addition. Stir in the dry ingredients followed by the buttermilk. Stir in one third of the rhubarb mixture, then spoon into prepared tin. 

Scatter over remaining fruit mixture, followed by the frozen hazelnut topping. Bake for about 1 1/2 hours or until a skewer inserted withdraws clean. Cool cake in tin for 30 minutes before cooling on a wire rack. 


This cake is delicious served warm from the oven, but surprisingly tasted better when cooled to room temperature so the rubbly topping is crunchy and sweet. With un-iced cakes, I am usually known to heat and add cream, crème fraiche and/or custard to any I possibly can,  but I didn't need to with this wondrous thing! The hazelnut meal gives the cake a nice density, but by no means does it create a grainy texture like it can it larger quantities. 

This cake is very resilient and although best eaten within a day or two, will easily last for a few days before the fruit starts to lose its colour. This. This is my favourite cake of the year. 

Recommended baking soundtrack: Kurt Vile - Smoke Ring for My Halo

Sunday, June 19

mocha whoopie pies


Being so in love with a few favourite food magazines has resulted in a pretty high expectation from cook books. Mathematically, the ratio of recipes I quickly lust over is generally much higher per page for magazines than it is the new cookbooks I encounter. This is sad, though I'm not sure it's entirely my fault. Firstly, new issues of magazines have the luxury of being relevant to Seasons. How can I not love a Donna Hay full of stews and puddings when it's a mere 15 degrees outside?! Secondly, the wonderful people in my life that have given my subscriptions have taken away the need for me to long for new recipes. I have been utterly satisfied in my temporary cook-book-less, yet still thoroughly delicious, life. But, I really did used to pride myself in knowing almost all new baking books to hit the shelves. It was almost impossible for someone to recommend me a book of sweet treats that I had not already seen.

So, when I recently saw a friend pick up a copy of 'Let's Make Whoopies' by Sophie Gray, I knew I had lost my touch, after living with my head in the glossy pages of epicurean magazines. I love whoopie pies! I should have seen this book's release coming a mile off. So, I got hold of a copy and was so surprised in my desire to if not make, at least eat every recipe within.  Seriously, I flicked from cover to cover at least a dozen times and my shortlist was still about 10 recipes. Thankfully, my better half chose this following mocha recipe, and how could I say no?


Ingredients (makes 8 whoopies, about 8cm wide)
Recipe adapted very slightly from Sophie Gray's Let's Make Whoopies

For whoopies:
140 gms plain flour
40 gms cocoa powder
1 tsp bicarbonate of soda
70 mls buttermilk
1 tsp vanilla extract
2 tbsps espresso
80 gms butter, softened
140 gms brown sugar
1 egg, lightly beaten

For filling:
50 gms butter, softened
150 gms cream cheese
20 gms cocoa
80 gms icing sugar
2 tbsps espresso

For topping:
110 gms icing sugar
30 gms cocoa powder
2 tbsps espresso
coffee beans

For the sponge whoopies, preheat the oven to 200C. Line two baking trays with baking paper. Sift the flour, cocoa powder and bicarb soda into a bowl. Mix together the buttermilk, vanilla and coffee. Set aside.

Cream the butter and sugar in an electric mixer until pale. Gradually add the egg, scraping down the sides of your bowl after each addition. With the mixer on low, pour in buttermilk mixture. Fold the flour mixture through with a large metal spoon, being careful not to over-mix.

Place mixture in a piping bag fitted with a plain 1cm tip, and pipe eight even mounds of mixture onto each baking tray, giving them plenty of space. Bake for 9 minutes - they will still be very soft to the touch, so cool on oven trays completely.


For the filling, mix the cream cheese and butter together in the bowl of an electric mixer until light and creamy. Add the cocoa and icing sugar and mix slowly until just combine. Slowly pour in the espresso while the motor is running, and continue to mix until smooth and spreadable.

For the topping, sift together the icing sugar and cocoa. Gradually add the espresso a little at a time, mixing between additions. The mixture should be smooth and slightly runny like honey, but still firm not to run straight off the whoopie. Spread topping onto half of the whoopies and top with a coffee bean, if you like. Allow to set slightly.

Pipe the filling onto the remaining, un-iced sponges and sandwich with the iced halves.


The other chocolate whoopie pie recipe I've made stresses the importance of using vegetable shortening to achieve a soft, un-cracked whoopie sponge, so I was curious to see how this recipe turned out. Sure, they crack slightly (what cake doesn't?), but they are still incredibly moist and soft. I don't know if I could pick a favourite recipe, but it helped that I had all the ingredients in my fridge and pantry for this one. The cream cheese filling is also a great combination to the sponge, which is really quite rich.

It's also worth mentioning that Sophie includes a lot of savoury, gluten-free (and low gluten) and egg free varities of whoopies.

Recommended baking soundtrack: Silver Jews - Lookout Mountain, Lookout Sea.

Wednesday, June 15

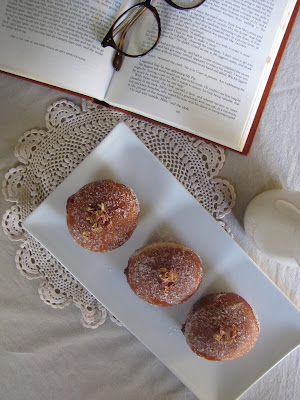
rosewater & raspberry jam filled doughnuts


My current favourite breakfast involves a strong flat white and a doughnut. Don't judge me. If it's somewhat redeemable, both the coffee and doughnut come from one of my absolute favourite destinations: Brewbakers, an artisan bakery in Albion, Brisbane. These doughnuts are no ordinary doughnuts, nor do they involve smarty eyes and freddo frogs. They're made from a sourdough base, and filled with either homemade raspberry jam, custard, or chocolate.

Having only made doughnuts myself once before, the Autumn issue of Donna Hay was of course a good enough reason to be inspired to put my deep-frying goggles back on (jokes) and fry some more dough, if only to limit my Brewbaker treat consumption levels. I'd added some rosewater to a good quality store-bought raspberry jam, but of course homemade would taste worlds better. 


Ingredients
Recipe slightly modified from Autumn issue of Donna Hay

2 tsps active dry yeast
1 1/2 tbsps lukewarm water
1/2 cup lukewarm milk
2 tbsps caster sugar
50 gms butter
2 1/4 cups plain flour
2 eggs
vegetable oil, for deep frying

2 cups raspberry jam
rosewater, to taste
rose sugar and dried rose petals, for dusting


Place the yeast, water, milk and 1 tbsp of sugar in a large bowl and set aside in a warm place for 10 minutes or until bubbles appear on the surface. Add the butter, flour, eggs and remaining sugar to the yeast mixture and use a butter knife to mix until a sticky dough forms. Turn out onto a lightly floured surface and knead until smooth. 

Place the dough in a lightly oiled bowl, cover with a clean, damp cloth and set aside in a warm place until doubled in size (about 45 minutes).

Knead the dough on a lightly floured surface for 5 minutes or until smooth and elastic. Roll out to 1cm thick and using an 8cm round cutter, cut ten rounds from the dough. Place the rounds on a baking tray lined with baking paper and set aside for 30 minutes until risen. 

Place the oil in a large, deep saucepan over a medium heat, measuring temperature of oil with a sugar thermometer until it reaches 180C. Cook the doughnuts, in batches, for 1 - 2 minutes each side, or until golden. Drain on paper towel. 


In a small bowl, mix jam with 2 tsps rosewater. Taste, and add more if desired (which I did). Spoon jam into a piping bag fitted with a 0.5 - 1cm plain tip. Carefully pierce the doughnuts with a sharp knife, and then fill with jam. To ensure the jam reaches the middle of your doughnut, it's probably best to create this hole on the underside, which means you won't have a messy jam-hole showing like my doughnuts below. But, this is up to you. 

Dust doughnuts with rose-infused sugar, and top with dried rose petals, if you like.


The most wonderful thing about homemade doughnuts is the lack of sickly-sweetness that I associate with the store-bought variety. The recipe shows how little sugar is really involved, and you can then pump your doughnut with as much sugar as you like depending on the type of jam you use. The draw-back is their shelf life, as they demand to be eaten on the same day they're created. Though, I think this can always be easily arranged. 

Recommended baking soundtrack: Micah P. Hinson - Micah P. Hinson And The Pioneer Saboteurs.

Monday, June 6

passionfruit & dark chocolate macarons


I'm finding myself in a somewhat strange situation: I'm baking so frequently I just can't keep up with myself. Banana sundae cake, s'mores macarons, apple spice cupcakes, vanilla bean bundt cake... So many opportunities to bake, to give food gifts and to celebrate have left me with little time to do this part. Thankfully, the Internet is so forgiving. 

These macarons were a result of a Saturday evening dinner hosted by a very stubborn but dear friend, who would accept no help and even sent me home with the bottle of wine I brought along with me. Thankfully, she was gracious enough hold onto a box of these passionfruit macarons, and I could feel slightly better about my contribution to the evening. Because giving is all about feeling better about yourself, right?

I love macaron shells when they're sandwiched with a tart fruit ganache. When remembering eating my first batch of macarons whilst in France, I remembered how amazed I was by the pairing of passionfruit -which I really feel quite luke warm about - and chocolate. My version may not be the true French experience, but it's pretty gosh darn wonderful.


Ingredients

For macaron shells:
150 gms ground almonds
150 gms icing sugar
110 gms egg whites, separated into 2 lots of 55 gms
150 gms white sugar
37 gms water
dash yellow food colouring

For ganache:
200 gms good quality dark chocolate (70% cocoa solids), chopped
1/2 cup cream
pulp of 3 passionfruit
1 - 2 cups icing sugar

Cocoa, to dust


For the macarons, mix the ground almonds and icing sugar together and pulse a few times in food processor to make almond meal finer, being careful not to over-process and release the oil in the almond meal. Sieve into a large bowl. Add colour and 55 gms of the egg whites to the sugar/almond mixture but do not mix in.

Place remaining 55 gms of egg whites in bowl of mixer fitted with the whisk.

Place white sugar and water into saucepan stir to combine and cook without stirring to 118C. Once the mixture reaches 115C start mixing the egg whites on high. Once the sugar syrup reaches 118C remove from heat and immediately pour in a thin stream down the side of the mixer bowl continuing to whisk on high. Continue to whisk the meringue on high until the side of the bowl is only a little warm to touch. The meringue mixture should be beautifully glossy.

Add meringue mixture to almond mixture and using a large spatula fold the mixture together until it starts to shine and forms a ribbon that stays visible for about 30 seconds.

Add the mixture to a piping bag fitted with a plain tip and pipe in lines onto baking trays lined with baking paper. Tap trays on the bench a few times to eliminate any air bubbles. Dust with cocoa powder.
Set aside for about 30 minutes or until the macarons have formed a skin that doesn't stick to your finger.

Meanwhile preheat oven to 140C . Bake the macaroons for around 13 to 15 minutes depending on size, they should not be browned. Remove the baking trays and immediately slide off the macarons and the baking paper onto the work surface and let cool completely before removing the shells.


For the ganache, place the chocolate in the bowl of an electric mixer. Place cream and passionfruit pulp in a small saucepan over medium heat until almost at boiling point. Remove immediately and pour cream through a strainer over the chocolate. Cover bowl and sit for a minute or two before stirring until smooth. Allow to cool for ten minutes. Begin adding icing sugar a little at a time, whilst beating, until at desired piping or spreading consistency. 


To finish, pipe shells with ganache. Allow to rest for 24 hours at room temperature for the passionfruit flavour to develop, if you can. It's worth it. 


Recommended baking soundtrack: Vetiver - The Errant Charm.