Monday, August 15

maple & pear macarons


It's sad to realise that for the better part of my life, I wasn't as close to maple syrup as I would have liked, and this is despite pancakes being one of the first things I learnt how to cook. I think it's fair in assuming that up until recent years, most Australian households were consuming... maple flavoured syrup. It's runnier, sweeter and sicklier. It has a funny after-taste and is just inferior. I forget the exact moment that I tasted real, thick, pure maple syrup for the first time, most likely because I was on such a sugary high that it simply didn't matter. But, I can never go back to maple flavoured syrup, even if it is about a quarter of the price. Sometimes, and often with food, quality matters. Paying extra is worth it.

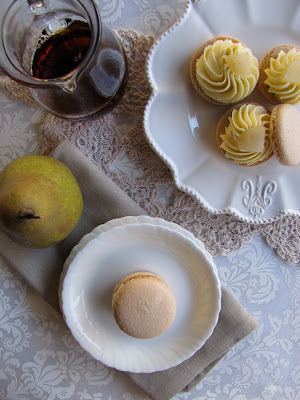
Maple syrup goes so well with most fruits, but in Autumn and Winter, I try to consume as many pears as possible. So it's only natural that eventually I realised these two flavours could only be improved upon in one way: in macaron form. I would have loved to have slices of dried pear atop these macarons, but this was just one too many steps in between me and a mapley macaron. So there's a nice improvement to this recipe, if you have the patience.


Ingredients
For macarons:
150 gms ground almonds
150 gms icing sugar
110 gms egg whites, separated into 2 lots of 55 gms
150 gms white sugar
37 gms water
dash brown food colouring


For maple buttercream:
300 gms butter, at room temperature
400 gms icing sugar, sifted (approximately)
2 tbsps pure maple syrup (not maple flavoured syrup!)

For poached pears:
2 beurre bosc pairs, peeled
4 cups water
1 1/3 cups sugar
vanilla bean, split and seeds scraped


For the macarons shells, follow instructions as shown here.

While macarons are resting and baking, you can poach your pears. Place sugar and water in a medium saucepan, and heat until the sugar has dissolved. Add the vanilla bean and seeds and your pears, covering with a cartouche to assist pears to cook evenly and to assist in reducing the liquid slightly. Simmer for about 20 minutes until just soft, and allow to cool in the sugary liquid. 

Once macarons have been baked and cooled, completely, make your maple buttercream. Mix the butter in the bowl on an electric mixer fitted with the paddle attachment, starting on a medium speed and increasing to high, until butter is smooth. Gradually add the icing sugar and maple syrup, whipping until at your desired consistency. 

Pipe buttercream onto half of your macaron shells, and top with a small piece of diced poached pear. Sandwich with remaining macaron shells.


Another way to subtly change your flavours would be to add extra flavours and spices to your poaching liquid: star anise, citrus peel, cinnamon. The options and endless, really. You could also then add some of your poaching liquid into the maple buttercream... I wish I'd thought of that earlier.

Recommended baking soundtrack: Horse Feathers - Thistled Spring. 


Sunday, August 7

elderflower cupcakes


I adore subtle floral flavours in baking: rosewater, orange blossom, lavender. So, why has my elderflower consumption up until this point been solely limited to a mixer that compliments gin (which is a pretty amazing combination, gin-lovers)?! Thankfully, I was surprised to discover not only whoopie pies, but a beautiful selection of cupcake recipes in 'Let's Make Whoopies', a fantastic and wonderfully presented book by Sophie Grey. My favourite, of course, was this attached recipe.

Elderflower is incredibly light and refreshing, and works perfectly with citrus. It's flavour is pretty subtle, so when adding it to the cream cheese, you may find you need more than what I've specified below. Sophie's original recipe suggested using elderflowers in addition to elderflower cordial in the cake mixture, so if you're lucky enough to be in a warmer climate than I currently am, give this a shot.

Ingredients (makes 12)
Recipe slightly adapted from Sophie Grey's 'Let's Make Whoopies' 

For cake:
175 gms self raising flour
2 tsps elderflower cordial
125 gms butter, at room temperature
175 gms caster sugar
2 eggs, lightly beaten
40 mls milk

For frosting:
50 gms butter, at room temperature
250 gms cream cheese, at room temperature
500 gms icing sugar, approximately
3 tsps elderflower cordial (or more, to taste)
green food colouring (I use Wilton Kelly Green)


Preheat your oven to 180C. Line a 12 cup capacity cupcake tray with liners.

Using an electric mixer fitted with the paddle attachment, cream together the butter and sugar until pale and fluffy (about five minutes), scraping down the sides of the bowl regularly. Slow the speed of your mixture down, and gradually add the beaten egg, a little at a time, again, whilst scraping down the sides of your bowl. Gently fold in the flour and milk, being careful not to over-mix. Stir through the elderflower cordial.


Divide the mixture evenly among your 12 cases (just over 2 tbsps per case), and bake for 15 - 20 minutes, until golden and lightly springy to the touch. Remove from tray immediately and cool on a wire rack.

When the cupcakes have cooled, mix the cream cheese and butter with an electric mixer until smooth and creamy. Gradually add icing sugar, about 1/2 cup at a time, beating well after each addition. You may find you need more or less icing sugar than recommended - this is really up to personal taste. To pipe your mixture, it should be able to hold it's shape. Add a very small amount of food colouring before filling a piping bag with a star tip, and generously piping frosting onto cupcakes.


It seems amongst all the recent madness in my life, I have been consumed with macarons, five layer tiered cakes, and other time consuming treats that I've forgotten how satisfying making a quick and easy batch of cupcakes can be, not to mention how much easier they are to travel with! Im sorry I left you, cupcakes. Let's make up. 

Recommended baking soundtrack: Bill Callahan - Sometimes I Wish We Were An Eagle.

Sunday, July 31

apple & blackberry pandowdy


Incase I haven't already toted on enough about how I prefer the milder seasons to an all imposing Brisbane Summer, let me bust into a monologue about desserts. Ice cream, sorbet and gelato are all wonderful. There are few things I love more than spontaneously deciding to go out for gelato at 8pm on a weeknight. But, these few things include Wintery desserts such as custards, crumbles, puddings, pies, pandowdies... Pandowdies?! According to my bible - AGT - a pandowdy is a pie whose lid is smashed (dowdied!) during the cooking process. The result is delicious jumble of pastry, berries and sweet juices making a mess all up in your oven.

This recipe uses a sour cream pastry which is so easy to make, and is wonderfully rich against apples and blackberries. Or, any other fruit, I imagine. A sprinkling of demerera (or raw, if you're desperate) sugar adds a little sweetness and crunchiness that is always welcome in my house.


Ingredients
Recipe from AGT August 2011


For pastry:
250 gms plain flour
40 gms pure icing sugar
rind of 1 lemon, finely grated
seeds of 1 vanilla bean
140 gms cold butter, cubed
120 gms sour cream (no low fat, please!)

For filling:
4 each granny smith and pink lady apples, cut into eighths
300 gms caster sugar
150 gms frozen blackberries
40 gms plain flour
juice of 2 mandarins
rind of 1 1/2 lemons, finely grated

demerera sugar, for sprinkling

For your pastry, process the flour, sugar, vanilla seeds, rind and 1/2 tsp salt in a food processor to combine. Add butter and pulse for about 30 seconds, until only small lumps remain. Add the sour cream, and pulse until mixture beings to come together. Turn the mixture out onto your bench top, and bring together with the heel of your hand. Form into a disc, wrap in plaaaastic, and allow to rest in the refrigerator for two hours.

Preheat your oven to 200C. Combine all of your filling ingredients in a large bowl before transferring to a generous pie dish.

Roll out the pastry on a lightly floured surface until 4mm thick. Brush the edges of the pie dish with water before placing pastry over the filling and pressing the rim of the dish to seal. Trim the edges with a sharp knife, and pierce a hole in the centre of your pastry. Lightly brush your pie with water and generously scatter the demerera. Bake for about 35 minutes until the pastry is crisp and golden.

Remove from the oven, and break pastry into pieces with a fork, pressing down into the filling. Bake until the filling bubbles over the pastry, and the pastry is dark and golden brown - about 25 minutes.


I usually have an inability to love the results of my baking unless it is aesthetically perfect, something that can be very exhausting at times. But I love the appearance of this dowdied pie, and can see myself squashing and re-baking plenty more pies in the future... It's strangely very satisfying. I can also see bakers with pie failures now feeling confident knowing their pies aren't deformed misfits, but are in fact a new and delicious addition to their dessert repertoire!

Recommended baking soundtrack: Grass Widow - Milo Minute.

Wednesday, July 27

happy belated birthday, heidi!


About two weeks ago, my dear sister turned thirty, and all has been a blur before, during and after. Choosing a loved one's birthday cake is always something I will start months in advance. I will search for a recipe or flavour combination almost as early as the day following their birthday the previous year. I'll decide upon a favourite, and then change my mind, and then lose a recipe or two until I settle on something I hope will be perfect, and that they will love. But, it's always particularly difficult choosing a cake to make my sister, and certainly not because she's fussy-- her and I definitely share our love of all things sweet and cakey. But each year, the cakes we make for each other have to be bigger and grander than the last. Two years ago, my sister made me a Cherry Ripe mudcake that weighed more than my cat. Last year, I made her a six layer black forest cake. I imagine (and hope) this will continue until forever.

This year, it may seem as though I've toned it down a little, but when I saw Sweetapolita's neapolitan cake, I knew I'd found 'the one'.  This cake is made from chocolate, strawberry and almond-y vanilla layers, and was big enough to feed all our friends and family. In my haste to get this cake finished, and in the excitement of my sister's birthday dinner, I took no real photos of the cake, much to my disappointment. So, since then I have re-created miniature versions for photographic and eating purposes. Okay, mostly for eating.


Each cake was beautiful and moist, and sandwiching them with some homemade strawberry jam was all they needed. The buttercream has strawberry extract and pure cream, which gives it a taste surprisingly close to old-fashioned strawberry ice cream. Please see Sweetapolita's blog for so many more perfect recipes accompanied by magnificent photography.  But be warned: you will feel inspired to bake absolutely every recipe within.


Recommended baking soundtrack: Tallest Man on Earth - Shallow Graves

Thursday, July 14

raspberry crème brûlée


Joyeux Quatorze Juillet! Last year, I bastardized a week's worth of French sweets, and this year I've had my Bastille-Day-week all mapped out with five flavours of crème brûlée. Then both of my kitchen torches failed, time sped up, and before I knew it I was cooking my sister's 30th birthday cake over three nights after work, and not giving a damn about making anglaise and crystalising sugar.

I did manage one recipe before my sense of organisation escaped me, and I'm glad it was such a tasty one. I decided to add raspberries to both the mixture and in the bases of each serving. It's nice to get a tart surprise at the bottom of sweet custard.  I love crème brûlée served in shallow dishes to maximise the amount of crunchy toffee, and these small ceramic spoons were the perfect choice.


Ingredients (makes 4 modest servings)

For custard:
500 mls pouring cream
1 vanilla bean, with seeds scraped
4 yolks
1/4 cup caster sugar

For raspberry puree:
200 gms raspberries
2 tbsps icing sugar

sugar for toffee
raspberries to garnish

For the raspberry puree, place berries and icing sugar in a small saucepan and stir, squashing the berries, over a medium heat until you have a pour-able consistency. Press the sauce through a fine sieve, and set aside. 

Preheat the oven to 160C. Place the cream and vanilla in a small saucepan and heat gently until cream is almost at boiling point - small bubbles will start to appear around the edges of the pan. 

Meanwhile, whisk the yolks and caster sugar in a medium sized bowl. When the cream is ready, slowly begin to pour into the egg mixture, whisking continuously. Whisk for about a minute to bring the temperature down slightly, before returning to the saucepan. Heat over a low heat until mixture is thick enough to thinly coat the back of a spoon. Stir through half of the puree.

Pour the remaining puree into the bottoms of each dish or vessel of your choise. Strain the custard, and gently pour on top of the puree. Place the dishes into a baking dish and fill the dish with enough boiling water to come halfway up the sides of each. Bake for approximately 25 minutes, keeping a close eye as cooking time will vary depending on the size of your servings. The custard should look set on the surface, but still have a gentle wobble. Remove from oven and water and allow to cool completely. 

To serve, generously sprinkle with sugar and caramelise with a kitchen torch until sugar begins to bubble. Serve with raspberries. 


The raspberry through the custard was quite subtle, so feel free to add more puree if you'd prefer. You could also add whole or crushed raspberries, but I wanted my crème brûlée to be as smooth as possible. I think there's little room for failure with custard and berries. 


Bonne Bastille!

Recommended baking soundtrack: Françoise Hardy - Et Si Je M'En Vais Avant Toi

Sunday, July 3

red velvet whoopie pies


While documenting my previous whoopie baking day, I came across a back shiny ball of fur in my backyard, which has been a little neglected since the weather has cooled. Scared that it was a creature, and that this creature may be dead, I sent my boyfriend down to poke and prod before I wanted to know what it was. Thankfully, it was alive, and most importantly, it was a cat! I adore cats dearly, and miss one in particular so much on a daily basis and this little (well, rather large) visitor was so much more than welcome. I spent what felt like two minutes - but what was probably more accurately about thirty minutes - sitting in my backyard patting and swooning over this handsome cat. Now,  I might have been cat-drunk, but it was during those moments that I realised how beautiful my backyard had become, full of dead leaves and Winter light.

The following weekend, I re-created the experience. Same time of day, but different whoopie recipe.
I'm quite ashamed to admit that I've never made red velvet anything - cupcakes, layer cakes... nothing. And so, red velvet cake came into my life. The cat didn't come back that day, but has another time since, and that's good enough for me, for now.


Ingredients
Recipe slightly adapted from Sophie Grey's Let's Make Whoopies


For whoopies:
180 gms plain flour
20 gms cocoa powder
1 tsp bicarbonate of soda
70 mls buttermilk
1 tsp vanilla bean paste
80 gms butter, softened
150 gms brown sugar
1 egg, lightly beaten
red food colouring (I use Wilton gel colours)

For filling:
50 gms butter, softened
150 gms cream cheese, softened
1 tsp vanilla bean paste
1 - 2 cups icing sugar, sifted

Preheat oven to 200C. Line two baking trays with baking paper.

Sift the cocoa, flour and bicarb soda into a bowl. Mix buttermilk, vanilla and food colouring and set aside.

Beat the butter and brown sugar in the bowl of an electric mixer until pale and creamy - scrape down the sides of your bowl regularly. With the motor running, slowly add the egg and mix well until completely combined. Fold in the wet and dry ingredients with a large metal spoon, being careful to not over-mix. If mixture is too dry, add more buttermilk with caution. The mixture should be quite thick, almost the consistency of smooth peanut butter.

Place mixture in a piping bag fitted with a 1cm plain tip, and pipe eight even mounds of mixture onto each baking tray, leaving plenty of space between each to spread whilst cooking. Bake for 9 minutes - they will still be very soft to the touch, so cool completely on trays.


For filling, mix cream cheese and butter together in the bowl of an electric mixer, fitted with the paddle attachment, until smooth. Add vanilla, then gradually spoon icing sugar into mixture while motor is running. After 1 cup has been added, increase speed until mixture is smooth and silky. Add more icing sugar if needed, a little at a time, until you get your desired consistency - because I was piping mixture on to the tops of each whoopie, I wanted mine quite firm.

Pipe filling onto half of your cooled whoopies, and sandwich with remaining halves. Change your piping bag's tip to a closed star, and pipe a small dollop onto the top of each whoopie. Top with a sugar pearl, flower or... anything you like.


In retrospect, I probably would have put more red food colouring into the mixture, but was taken over by the need to eat them as soon as possible. I haven't added an amount to the recipe so you can be the judge of how intense you want the colour to be, especially because it will vary dramatically depending on if you're using liquid, gel or powder. 

Recommended baking soundtrack: Micah P Hinson - Micah P. Hinson and the Red Empire Orchestra.

Monday, June 27

rhubarb & strawberry buckle (an ode to rhubarb)


Rhubarb. Oh, rhubarb. I tell people pumpkin is my favourite vegetable: your ambiguous nature means I constantly forget about you, but how I love you so. 

My sister and I had a wonderful childhood in that we always ate such a beautiful variety of fresh food, but I don't remember rhubarb as a part of this. It's one of the few foods my mother doesn't eat, so it wasn't until I was in my teenage years that I remember first trying it: in a cosy restaurant in the Gold Coast hinterland, as part of rhubarb crumble swimming in homemade custard. Love. at. first. taste. So now, rhubarb and me, we're making up for lost time. 

This 'buckle' is similar to a coffee or crumble cake, requiring the crunchy toping to be frozen before baking, ensuring it doesn't just melt and get absorbed into the cake mixture. It's incredibly easy to make, but has a slow cooking time, so is perfect to make on a cold Sunday afternoon. 


Ingredients
Recipe from June issue of AGT

250 gms each of strawberries and rhubarb, roughly chopped
110 gms each of caster sugar and rapadura* sugar
160 gms butter, at room temperature
2 eggs
220 gms plain flour
40 gms hazelnut meal
1 tsp baking powder
1/2 tsp bicarbonate of soda
2 tsps each of ground cinnamon and ginger
165 mls buttermilk

For hazelnut topping:
80 gms rapadura* sugar
40 gms plain flour
40 gms hazelnuts, roughly chopped
20 gms butter, melted

*Use dark brown sugar if you can't find rapadura sugar. 


Preheat the oven to 170C. Grease a 24cm round cake tin, and line with baking paper. 

For the crunchy hazelnut topping, combine ingredients in a small bowl. Freeze until required - this will stop the topping from melting into the cake during baking. 

Combine rhubarb and strawberry in a bowl with 1 tbsp of each sugar and set aside.


Beat butter and remaining sugars in the bowl of an electric mixer for about 5 minutes, or until light and fluffy. Scrape down the sides of the bowl, then with motor running, add eggs one at a time, beating well after each addition. Stir in the dry ingredients followed by the buttermilk. Stir in one third of the rhubarb mixture, then spoon into prepared tin. 

Scatter over remaining fruit mixture, followed by the frozen hazelnut topping. Bake for about 1 1/2 hours or until a skewer inserted withdraws clean. Cool cake in tin for 30 minutes before cooling on a wire rack. 


This cake is delicious served warm from the oven, but surprisingly tasted better when cooled to room temperature so the rubbly topping is crunchy and sweet. With un-iced cakes, I am usually known to heat and add cream, crème fraiche and/or custard to any I possibly can,  but I didn't need to with this wondrous thing! The hazelnut meal gives the cake a nice density, but by no means does it create a grainy texture like it can it larger quantities. 

This cake is very resilient and although best eaten within a day or two, will easily last for a few days before the fruit starts to lose its colour. This. This is my favourite cake of the year. 

Recommended baking soundtrack: Kurt Vile - Smoke Ring for My Halo

Sunday, June 19

mocha whoopie pies


Being so in love with a few favourite food magazines has resulted in a pretty high expectation from cook books. Mathematically, the ratio of recipes I quickly lust over is generally much higher per page for magazines than it is the new cookbooks I encounter. This is sad, though I'm not sure it's entirely my fault. Firstly, new issues of magazines have the luxury of being relevant to Seasons. How can I not love a Donna Hay full of stews and puddings when it's a mere 15 degrees outside?! Secondly, the wonderful people in my life that have given my subscriptions have taken away the need for me to long for new recipes. I have been utterly satisfied in my temporary cook-book-less, yet still thoroughly delicious, life. But, I really did used to pride myself in knowing almost all new baking books to hit the shelves. It was almost impossible for someone to recommend me a book of sweet treats that I had not already seen.

So, when I recently saw a friend pick up a copy of 'Let's Make Whoopies' by Sophie Gray, I knew I had lost my touch, after living with my head in the glossy pages of epicurean magazines. I love whoopie pies! I should have seen this book's release coming a mile off. So, I got hold of a copy and was so surprised in my desire to if not make, at least eat every recipe within.  Seriously, I flicked from cover to cover at least a dozen times and my shortlist was still about 10 recipes. Thankfully, my better half chose this following mocha recipe, and how could I say no?


Ingredients (makes 8 whoopies, about 8cm wide)
Recipe adapted very slightly from Sophie Gray's Let's Make Whoopies

For whoopies:
140 gms plain flour
40 gms cocoa powder
1 tsp bicarbonate of soda
70 mls buttermilk
1 tsp vanilla extract
2 tbsps espresso
80 gms butter, softened
140 gms brown sugar
1 egg, lightly beaten

For filling:
50 gms butter, softened
150 gms cream cheese
20 gms cocoa
80 gms icing sugar
2 tbsps espresso

For topping:
110 gms icing sugar
30 gms cocoa powder
2 tbsps espresso
coffee beans

For the sponge whoopies, preheat the oven to 200C. Line two baking trays with baking paper. Sift the flour, cocoa powder and bicarb soda into a bowl. Mix together the buttermilk, vanilla and coffee. Set aside.

Cream the butter and sugar in an electric mixer until pale. Gradually add the egg, scraping down the sides of your bowl after each addition. With the mixer on low, pour in buttermilk mixture. Fold the flour mixture through with a large metal spoon, being careful not to over-mix.

Place mixture in a piping bag fitted with a plain 1cm tip, and pipe eight even mounds of mixture onto each baking tray, giving them plenty of space. Bake for 9 minutes - they will still be very soft to the touch, so cool on oven trays completely.


For the filling, mix the cream cheese and butter together in the bowl of an electric mixer until light and creamy. Add the cocoa and icing sugar and mix slowly until just combine. Slowly pour in the espresso while the motor is running, and continue to mix until smooth and spreadable.

For the topping, sift together the icing sugar and cocoa. Gradually add the espresso a little at a time, mixing between additions. The mixture should be smooth and slightly runny like honey, but still firm not to run straight off the whoopie. Spread topping onto half of the whoopies and top with a coffee bean, if you like. Allow to set slightly.

Pipe the filling onto the remaining, un-iced sponges and sandwich with the iced halves.


The other chocolate whoopie pie recipe I've made stresses the importance of using vegetable shortening to achieve a soft, un-cracked whoopie sponge, so I was curious to see how this recipe turned out. Sure, they crack slightly (what cake doesn't?), but they are still incredibly moist and soft. I don't know if I could pick a favourite recipe, but it helped that I had all the ingredients in my fridge and pantry for this one. The cream cheese filling is also a great combination to the sponge, which is really quite rich.

It's also worth mentioning that Sophie includes a lot of savoury, gluten-free (and low gluten) and egg free varities of whoopies.

Recommended baking soundtrack: Silver Jews - Lookout Mountain, Lookout Sea.

Wednesday, June 15

rosewater & raspberry jam filled doughnuts


My current favourite breakfast involves a strong flat white and a doughnut. Don't judge me. If it's somewhat redeemable, both the coffee and doughnut come from one of my absolute favourite destinations: Brewbakers, an artisan bakery in Albion, Brisbane. These doughnuts are no ordinary doughnuts, nor do they involve smarty eyes and freddo frogs. They're made from a sourdough base, and filled with either homemade raspberry jam, custard, or chocolate.

Having only made doughnuts myself once before, the Autumn issue of Donna Hay was of course a good enough reason to be inspired to put my deep-frying goggles back on (jokes) and fry some more dough, if only to limit my Brewbaker treat consumption levels. I'd added some rosewater to a good quality store-bought raspberry jam, but of course homemade would taste worlds better. 


Ingredients
Recipe slightly modified from Autumn issue of Donna Hay

2 tsps active dry yeast
1 1/2 tbsps lukewarm water
1/2 cup lukewarm milk
2 tbsps caster sugar
50 gms butter
2 1/4 cups plain flour
2 eggs
vegetable oil, for deep frying

2 cups raspberry jam
rosewater, to taste
rose sugar and dried rose petals, for dusting


Place the yeast, water, milk and 1 tbsp of sugar in a large bowl and set aside in a warm place for 10 minutes or until bubbles appear on the surface. Add the butter, flour, eggs and remaining sugar to the yeast mixture and use a butter knife to mix until a sticky dough forms. Turn out onto a lightly floured surface and knead until smooth. 

Place the dough in a lightly oiled bowl, cover with a clean, damp cloth and set aside in a warm place until doubled in size (about 45 minutes).

Knead the dough on a lightly floured surface for 5 minutes or until smooth and elastic. Roll out to 1cm thick and using an 8cm round cutter, cut ten rounds from the dough. Place the rounds on a baking tray lined with baking paper and set aside for 30 minutes until risen. 

Place the oil in a large, deep saucepan over a medium heat, measuring temperature of oil with a sugar thermometer until it reaches 180C. Cook the doughnuts, in batches, for 1 - 2 minutes each side, or until golden. Drain on paper towel. 


In a small bowl, mix jam with 2 tsps rosewater. Taste, and add more if desired (which I did). Spoon jam into a piping bag fitted with a 0.5 - 1cm plain tip. Carefully pierce the doughnuts with a sharp knife, and then fill with jam. To ensure the jam reaches the middle of your doughnut, it's probably best to create this hole on the underside, which means you won't have a messy jam-hole showing like my doughnuts below. But, this is up to you. 

Dust doughnuts with rose-infused sugar, and top with dried rose petals, if you like.


The most wonderful thing about homemade doughnuts is the lack of sickly-sweetness that I associate with the store-bought variety. The recipe shows how little sugar is really involved, and you can then pump your doughnut with as much sugar as you like depending on the type of jam you use. The draw-back is their shelf life, as they demand to be eaten on the same day they're created. Though, I think this can always be easily arranged. 

Recommended baking soundtrack: Micah P. Hinson - Micah P. Hinson And The Pioneer Saboteurs.

Monday, June 6

passionfruit & dark chocolate macarons


I'm finding myself in a somewhat strange situation: I'm baking so frequently I just can't keep up with myself. Banana sundae cake, s'mores macarons, apple spice cupcakes, vanilla bean bundt cake... So many opportunities to bake, to give food gifts and to celebrate have left me with little time to do this part. Thankfully, the Internet is so forgiving. 

These macarons were a result of a Saturday evening dinner hosted by a very stubborn but dear friend, who would accept no help and even sent me home with the bottle of wine I brought along with me. Thankfully, she was gracious enough hold onto a box of these passionfruit macarons, and I could feel slightly better about my contribution to the evening. Because giving is all about feeling better about yourself, right?

I love macaron shells when they're sandwiched with a tart fruit ganache. When remembering eating my first batch of macarons whilst in France, I remembered how amazed I was by the pairing of passionfruit -which I really feel quite luke warm about - and chocolate. My version may not be the true French experience, but it's pretty gosh darn wonderful.


Ingredients

For macaron shells:
150 gms ground almonds
150 gms icing sugar
110 gms egg whites, separated into 2 lots of 55 gms
150 gms white sugar
37 gms water
dash yellow food colouring

For ganache:
200 gms good quality dark chocolate (70% cocoa solids), chopped
1/2 cup cream
pulp of 3 passionfruit
1 - 2 cups icing sugar

Cocoa, to dust


For the macarons, mix the ground almonds and icing sugar together and pulse a few times in food processor to make almond meal finer, being careful not to over-process and release the oil in the almond meal. Sieve into a large bowl. Add colour and 55 gms of the egg whites to the sugar/almond mixture but do not mix in.

Place remaining 55 gms of egg whites in bowl of mixer fitted with the whisk.

Place white sugar and water into saucepan stir to combine and cook without stirring to 118C. Once the mixture reaches 115C start mixing the egg whites on high. Once the sugar syrup reaches 118C remove from heat and immediately pour in a thin stream down the side of the mixer bowl continuing to whisk on high. Continue to whisk the meringue on high until the side of the bowl is only a little warm to touch. The meringue mixture should be beautifully glossy.

Add meringue mixture to almond mixture and using a large spatula fold the mixture together until it starts to shine and forms a ribbon that stays visible for about 30 seconds.

Add the mixture to a piping bag fitted with a plain tip and pipe in lines onto baking trays lined with baking paper. Tap trays on the bench a few times to eliminate any air bubbles. Dust with cocoa powder.
Set aside for about 30 minutes or until the macarons have formed a skin that doesn't stick to your finger.

Meanwhile preheat oven to 140C . Bake the macaroons for around 13 to 15 minutes depending on size, they should not be browned. Remove the baking trays and immediately slide off the macarons and the baking paper onto the work surface and let cool completely before removing the shells.


For the ganache, place the chocolate in the bowl of an electric mixer. Place cream and passionfruit pulp in a small saucepan over medium heat until almost at boiling point. Remove immediately and pour cream through a strainer over the chocolate. Cover bowl and sit for a minute or two before stirring until smooth. Allow to cool for ten minutes. Begin adding icing sugar a little at a time, whilst beating, until at desired piping or spreading consistency. 


To finish, pipe shells with ganache. Allow to rest for 24 hours at room temperature for the passionfruit flavour to develop, if you can. It's worth it. 


Recommended baking soundtrack: Vetiver - The Errant Charm. 

Sunday, May 22

earl grey tea cake


I adore this time of year. With the change of weather, a clear day's sky actually looks blue, in comparison to the harsh bright white sky I squint through over the Summer months. I love being able to enjoy the Brisbane sun without the humidity. And with the mornings' temperature quite abruptly dropping, it's so easy for a simple cup of tea to seem to much better than I ever remembered. So as my tea consumption hits an all-year high, I of course need a new tea cake recipe to accompany my all-time favourite beverage.

Ingredients

1 cup chopped fresh dates
1 tsp bicarbonate of soda
3/4 cup freshly brewed earl grey tea
2 apples, peeled and grated
1 1/4 cups self raising flour, sifted
3/4 cup brown sugar
150 gms unsalted butter, melted
1/4 tsp ground vanilla bean (or 1 tsp vanilla extract)
4 eggs


Preheat oven to 160C. Grease and line a 10-cup capacity loaf tin with baking paper - I used a standard sized tin and four mini loaf tins.

Place the dates, tea and bicarb soda in a bowl and set aside for 10 minutes. Using a stick blender, blend the date mixture until smooth. Alternatively, process in a blender or food processor.


Place the apple, flour and sugar in a bowl and mix to combine. Add the butter, eggs, vanilla and date mixture and mix well to combine. Spoon into your loaf tin/s, and bake large loaf for 40 - 55 minutes (small loafs for 20 - 25 minutes) until cooked when tested with a skewer. Allow to cool in tin for ten minutes before turning out on a wire rack.


This is such an incredibly quick and easy recipe, and the result is perfect straight from the oven with (or without) a nice melty patch of butter, or even toasted until slightly crispy on the edges. I've since frozen the remains of this batch and look forward to getting a mini-loaf out of the freezer each day. It's also nice to have a tea-style loaf that isn't filled with banana, given their insane prices right now. 


Even our neighbourhood birds enjoyed a slice or two. 


Recommended baking soundtrack: Okkervil River - The Stand Ins

Tuesday, April 26

chocolate & sour cherry hot cross buns


Apologies in advance: I am the reason hot cross buns are sold in January. I will buy them as soon as they're available and continue to do so until all that remains are the squashed, discounted remnants the masses of frenzied shoppers leave behind post-Easter weekend. Despite not being big on fruit peel, I love the hot cross buns' perfect balance of spice and fruit and their imperfect crosses. Yes, I realise supermarkets sell the cross-less varieties all year round, but it's not the same! And yes, I realise I could make my own at anytime of year. You have a point...

I'm a traditionalist, and have always preferred the original variety. So despite previously scoffing at those who buy fruitless or chocolate varieties, I was strangely compelled to include chocolate in my hot cross bun recipe to compliment the sour dried cherries I have finally found after so much searching. I still managed to stuff some spices into the recipe, though. How could I not?

Ingredients (makes 12 buns)

For the buns:
2 tbsps dried yeast
1/4 cup caster sugar
1 1/2 cups warm milk
4 1/4 cups plain flour
2 tsps all spice
2 tsps ground cinnamon
50 gms butter, melted
1 egg
1/4 cup caster sugar, extra
200 gms dried sour cherries
100 gms dark chocolate, chopped roughly.

For the crosses:
1/4 cup plain  flour
1/3 cup water

For the glaze:
2 tsps sugar
1 tsp powdered gelatine
1/4 cup water

Combine the yeast, sugar and milk in a bowl. Set aside for 5-10 minutes or until bubbles form on the surface.
Place the flour, dried cherries, chocolate, spices, butter, egg, extra sugar in a large bowl. Form a well, and pour in yeast mixture. Mix with a flat blade knife until a sticky dough forms. Knead on a lightly floured surface for 5 minutes or until dough feels smooth and elastic when pressed. Push in any cherries that fall out whilst kneading back into mixture - this tends to happen a lot! Place in an oiled bowl, cover with a tea towel and stand in a warm place for 30 minutes or until doubled in size.

Lightly knead the dough again, twist to divide dough in half. Half each half, and then divide each piece into thirds. Or, less confusingly, divide into twelve even pieces. Roll each into a ball. Place in a 23cm square cake tin lined with non-stick baking paper - they will be touching, but will break apart easily when baked. Cover with a clean tea towel and set aside in a warm place for 25–30 minutes or until doubled in size.


Meanwhile, preheat oven to 200C. To make the crosses, place the flour in a small bowl and gradually and water, stirring, until you're able to make a smooth paste. Place in a piping bag with a small round tip, and pipe crosses onto the buns. Bake for 30 minutes or until well browned and springy to touch.


Meanwhile, for the glaze, combine the sugar, gelatine and water in a small saucepan over medium heat and stir for 2 minutes or until dissolved. Using a pastry brush, brush warm buns with the glaze and eat immediately! 


These are a little less resilient than the store-bought and preservative-pumped variety, and are best eaten within a day or two of making, but will freeze incredibly well if you need. They are wonderful toasted with or without butter, as the chocolate chunks go all melty and delicious. Alternatively, if you need a recipe to use the last of your buns, come back soon!


Recommended baking soundtrack: Emily Haines & The Soft Skeleton - Skeletons Don't Have Your Back.