Saturday, June 26

jam doughnut cupcakes


I have a crippling fear of spiders, heights and baking with yeast. I understand the first two are dreadfully common and don't need justifying.

I think I'm an incredibly patient baker. I'm fine with complex, multi-step recipes. No sweat having to wait for things to completely chill, or bringing syrups to exact temperatures. Pastry is a-okay. But yeast? With all the kneading, and punching. Rolling and waiting. And waiting again. And again. I resigned myself to the fact that the only yeast products I would be consuming would be store-bought. That was, of course, until I received a copy of Australian Gourmet Traveller's June edition, featuring eight pages of doughnut bliss.

Starting simple, I've made doughnuts to sit atop some strawberry jam filled cinnamon cakes. This was no speedy process, and I did spend my afternoon in cycles of making a mess, cleaning the mess, and waiting between each step. However, I can't believe how much fun it all is! To cut that fluffy elastic dough into the cutest little rings and to later watch them swell up as they're dropped into hot oil had me in heaven. I'm already planning my next doughnut day.


Ingredients (makes 12 cakes, and roughly 24 doughnuts)
Doughnut recipe adapted from Australian Gourmet Traveller

For doughnuts:
390 mls lukewarm full-fat milk
125 gms caster sugar
75 gms butter, softened, plus extra for greasing
14 gms dried yeast
2 eggs, at room temperature
700 gms plain flour, plus extra for dusting
1 1/2 cups caster sugar, extra
3 tsps ground cinnamon

Vegetable oil for deep frying

For cakes:
90 gms butter, softened
1/2 cup caster sugar
1 cup self raising flour
2 tbsps milk
2 eggs
1 tsp vanilla bean extract
1 tsp cinnamon (more with caution if you wish)
2 tsps strawberry jam

300 mls thickened cream
2 tbsps icing sugar, sifted
1 tsp vanilla bean paste

For doughnuts, combine flour, sugar, butter, yeast, eggs, half the flour and a pinch of salt in the bowl of an electric mixer fitted with a dough hook. Beat on medium speed until smooth and combined (about 4 - 5 mins). Add the remaining flour a little at a time, beating until dough is smooth and elastic and no longer sticks to the bowl (about another 4 - 5 minutes). Transfer dough to a lightly buttered bowl, cover with plastic wrap and stand in a warm place until doubled in size (1 - 1 1/2 hours).

Meanwhile, for cakes, preheat oven to 180C/160C fan-forced. Place 12 paper cases into a 12 capacity cupcake tins.

Place all ingredients (excluding jam) in the bowl of an electric mixer, and beat until just combined. Increase speed, and beat until mixture is creamy and paler in colour. Spoon mixture among cases. Bake for 20 minutes, until golden. Remove cakes from tin immediately, and allow to cool completely on wire rack.

For doughnuts, knock back dough, then roll out on a lightly floured surface to 1cm thick. Cut out 4 - 5 cm rounds with a floured cutter, then cut a hole in the centre of each with a large pastry tip (about 1cm). Transfer doughnuts to two light floured baking trays, allowing space in between to rise. Cover with a tea towel and stand for 45 mins - 1 hour until risen.  


While doughnuts are rising, fill cooled cupcakes. Using a small sharp knife and - holding your knife at a 45 degree angle - slice a circle into the top of a cake. Set lid aside for later. Repeat with remaining cakes. Fill holes with strawberry jam and replace with lids, trimming them down if necessary so lids sit flush with cake tops. 

To finish off doughnuts, combine extra caster sugar and cinnamon in a large bowl. Preheat oil in a deep sided saucepan to 180C. Deep-fry doughnuts in batches, turning occasionally until golden. Be careful when lowering them into the oil as oil may spit. Drain on a paper towel on a wire rack while frying remaining doughnuts. Toss doughnuts it cinnamon sugar. 


To finish off, beat cream, icing sugar and vanilla until soft, silky peaks form. You want it to just be able to hold it's shape but still be velvety smooth. Spread generously onto cakes, and top with a fresh doughnut. 


I know this all looks long and too involved, but I'm a convert: making your own doughnuts is incredible rewarding. These chubby little golden babies have such lovely, crispy exteriors but are so much lighter than the store bought variety. Despite being somewhat terrified of deep frying (I seriously started off wearing safety goggles), the oil doesn't spit but fizzles as you drop the batter in. It's really quite satisfying and dreadfully exciting to watch. 

I imagine these doughnuts would also taste gorgeous on a vanilla malt cake. Or covered in chocolate on a mudcake for a more 'grown-up' affair. Or just mushed whole in your mouth without the cake!

Note: despite these cakes having a bit of resilience, the doughnuts are best eaten the day of making. They're obviously still edible a day after if stored in an airtight container, but the sugar will begin to break down. Worse things have happened. 

Recommended baking soundtrack: Animal Collective - Feels (or their entire catalogue if you're going through the with whole recipe :/ )

Friday, June 25

blushing lemonade


Every now and then, I come across a product that I love so much, I think it must have been created simply for me. Rose pashmak was the last time I felt like I'd found my soul mate. Until yesterday, in my favourite delicatessen, I found you, rose nectar. 

As the beautiful bottle details, rose nectar is made from the essential nectar of the Kazanlak Rose from Central Bulgaria. 

A little bit unadventurous, but to maximise on my excitement while it's still fresh, I've made a simple and refreshing drink. But I have grand plans for this beautiful nectar, oh yes. Gin. Champagne. Sugar syrup. Sorbet...

2 parts Sense rose nectar
6 parts lemonade
squeeze of fresh lemon

Pour rose nectar over ice. Top with lemonade and squeeze of lemon. Stir gently to combine. 

Thursday, June 24

macaron challenge v2.0: chocolate & orange


So, I recently stated my plans to create all 35 flavours of macarons detailed in Alison Thompson's delightful 'Macaron'. I haven't yet decided if I was entirely serious, although I did promise my boyfriend I would be creating a new flavour approximately once per week. Despite not sticking to this time commitment (or any, in fact), I'm two flavours down with a mere 33 to go. It's a start, and a delicious one at that.

This round, I changed the ganache around a touch, using a higher chocolate content to get my desired consistency with less refrigeration time needed. Experiment as you wish.

Ingredients (makes 30 macarons, depending on the size)
Recipe adapted from 'Macaroon' by Alison Thompson

For macaron shells:
225 gms pure icing sugar
140 gms almond meal
110 gms eggs whites, at room temperature
2 tsp cocoa

For filling:
200 gms milk chocolate, chopped
1/2 cup pouring cream
1 tbsp orange liqueur
finely grated zest of two oranges

Line two baking trays with baking paper. 

For macaron shells, combine the icing sugar and almond meal, and sift together twice (important!), discarding anything remaining in the sieve. This ensures your mixture won't be grainy. In the bowl of an electric mixer, beat the egg whites on a high speed until stiff peaks form. Add a small amount of orange food colouring to egg whites, and mix until colour has evenly spread through mixture. 

Fold the sifted sugar and almond meal into egg whites, continuing to fold until the mixture is glossy and moves slowly when the bowl is tilted. Remember, it's imperative that the mixture is smooth, so don't be overly concerned with loosing air through folding. We're not making sponge, here. 

Spoon the mixture into a piping bag fitted with a 5mm plain piping tube. Pipe rounds 3cm in diameter onto the baking tray, spacing them 2 - 3cms apart. Sprinkle shells with cocoa. Tap the trays firmly on the bench a couple of times to knock out any air bubbles. 

The macaron shells must now sit at room temperature until a crust forms - this will take 2 - 6 hours, depending on the temperature of the room (the warmer and drier the room, the faster the drying process will be). When they are ready, you should be able to touch the tops slightly and have no mixture stick to your finger.


Preheat oven to 150C fan-forced. 

Place macaron shells into the oven and immediately turn the temperature down to 130C. Bake for 10 - 12 mins, until firm to the touch but not coloured. Remove from the oven and allow to cool completely before carefully removing from oven trays. 

For the filling, melt the chocolate over a double boiler. Pour the cream into a small saucepan, add the finely grated orange zest and bring to the boil. Stand for ten minutes to infuse. Strain the cream to remove the zest, reheat until hot, then pour it over the chocolate and stir until smooth. Add the orange liqueur and mix well. Refrigerate for about 30 mins or until firm enough to hold its shape. 

Spread or pipe cooled and thickened filling onto half the shells, and sandwich with remaining shells. 


These are seriously delicious. As special as my gingerbread macarons were, this flavour surpasses them for me and everyone else who was lucky enough to try both. They are surprisingly orangey, and I just think this flavour combination can't be beaten. Well, we'll see... 

Monday, June 14

cranberry filled lemon cakes


I've previously raved about Fiona Cairns' beautiful book 'Bake & decorate: tea time luxury'. It contains a wonderful list of cake and cupcake recipes, with beautiful yet simple decorating ideas to compliment them.

In celebration of what has been a very cold long weekend, I've created some of Fiona's adorable, wintery penguins to sit atop some snowy frosted cakes. They are really simple and fun to make, and any imperfection just adds character. Feel free to dust the final product with some icing sugar - I just didn't have the heart to snow on my penguins. I'm gosh darn smitten. I don't know how I will possibly bite into one...

Ingredients

For cakes:
90 gms butter, softened
1/2 cup caster sugar
1 tsp vanilla
1 cup self raising flour
2 tbsps milk
2 eggs
finely grated rind of 1 lemon

For meringue icing:
3 egg whites
1 cup caster sugar
80 mls water

For cranberry filling:
170 gms craisins
125 mls water
1/4 cup caster sugar

For penguins:
250 gms black fondant/sugar paste/ready to roll icing
50 gms white fondant
1 egg white
250 gms icing sugar, sifted
yellow and black food colourings

For cranberry filling, add all ingredients to a small saucepan and bring to the boil. Stir until sugar has dissolved. Continue to simmer for 5 - 10 mins until mixture has thickened and craisins are plump. Set aside to cool.

For cakes, preheat oven to 180C/160C fan-forced. Place 12 paper cases into a 12 capacity cupcake tins.

Place all ingredients in the bowl of an electric mixture, and beat until just combined. Increase speed, and beat until mixture is creamy and paler in colour. Spoon mixture among cases. Bake for 20 minutes, until golden. Remove cakes from tin immediately, and allow to cool completely on wire rack.

For penguins, roll small quantities of black fondant into rounded cone shapes (various sizes work well. I made sizes ranging from about 1.5cm high to about 4cm high). With a pair of small scissors (or a small, sharp knife), snip out two wings on each penguin and ease them away from their bodies - using a toothpick makes this a little easier.

Make royal icing by mixing egg white and icing sugar together in a small bowl. Place some icing in a small zip lock back, and make a piping bag by snipping a very small tip off one of the bottom corners. Pipe two small eyes on each penguin.

Roll out a little ball of white fondant and squash to form the penguin's belly. Stick on using a little smear of royal icing. Tint remaining icing yellow. Pipe beaks onto each penguin using another home-made piping bag. Create eyeballs for your penguin by dipping a toothpick into some black food colouring, and dotting in the centre of each royal icing eye. Set penguins aside in a dry place.


Once both cakes and cranberry filling have cooled completely, take a small sharp knife and - holding your knife at a 45 degree angle - slice a circle into the top of a cake. The circle should be about 5mm from the edge of the cake to make it easy to cover when decorating. By holding your knife at this angle, you are creating a cone-shaped hold in your cake, and the lid you've created should come easily. Set lid aside for later. Repeat with remaining cakes.

Fill each cake with cranberries, pushing down to make them quite compact, and then replace lids. If necessary, trim the pointed end of the lids off to it sits flush when placed back onto the cake.

For snowy meringue icing, combine the sugar and the water in a small saucepan. Stir over a medium heat until sugar has completely dissolved. Increase heat and boil - without stirring - for approximately five minutes until syrup reaches 116C on a candy thermometer. Your syrup should have slightly thickened, but don't let it get any colour! Remove from heat and let bubbles subside.

Beat egg whites in an electric mixer until soft peaks form. While the motor is still running, pour sugar syrup into egg whites in a slow, steady stream. Continue to beat until mixture has cooled and is thick and glossy.

Spread cakes with snowy meringue and top with a penguin or two!


Recommended baking soundtrack: Beach House - Devotion

Sunday, June 13

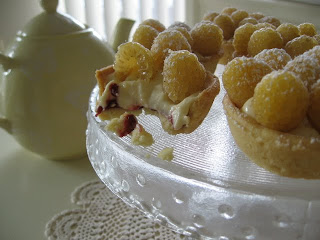
golden raspberry custard tarts


Early yesterday morning, when most people were still in their warm, warm beds, I was skipping breakfast (I never EVER do this), fumbling to find car keys, and driving through the cold and darkness of 6am. And now, when most people are working or resting hangovers, I'm here eating raspberry tarts. It all evens out, really.

The insane starting hour was to get to Eumundi Markets at a reasonable time before the masses do. And there are masses. A mission intended for scooping up some baby clothes for my sister turned out to be unsucessful, but quickly turned into a very fruitful food shop. It was here that I tasted probably the best strawberries I've had in recent memory, and picked up some beautiful slut red (Nigella's words, not mine!) and golden yellow raspberries.  

The flavour of golden raspberries is really much the same. A little less sweet maybe? So, to use these lovelies at their very best, I've whipped up some simple tarts to make my favourite day of the week even sweeter. You can, of course, use regular raspberries. Or strawberries. Or whatever!

Ingredients (makes 12)

For pastry cases:
1 3/4 cups plain flour
1/4 cup icing sugar
185 gms cold butter, chopped coarsely
1 egg yolk
2 tsps iced water

For custard cream:
1 cup full-fat milk
1 tsp vanilla bean paste (or 1 vanilla bean, split and seeds scraped)
3 egg yolks
1/3 cup caster sugar
2 tbsps cornflour
1/3 cup thickened cream, whipped

For raspberry coulis:
100 gms raspberries
1 tbsp icing sugar

2 punnets (approximately 60) fresh raspberries
icing sugar, to dust optional)

To make cases, process flour, sugar and butter until crumbly. With motor running, add egg yolk and enough water to bring ingredients together. Turn dough onto a lightly floured surface and knead until smooth and then refrigerate for 30 mins.

Meawhile, to make custard cream, combine milk and vanilla (paste or whole pod and seeds) in a small saucepan and heat over a low to medium heat until it just reaches the boil. Remove from heat.

Beat egg yolks, sugar and cornflour until thick and pale. Gradually pour hot milk mixture into eggs, whisking continuously so eggs do not scramble. If using an electric mixer, simply leave motor running.

Return custard to saucepan, and gently heat, stirring continuously, until mixture thickens and starts to bubble. Pour into a large heatproof bowl, cover the surface with glad wrap and refrigerate for an hour.

Grease 12 capacity cupcake tins. Roll out half the chilled pastry on a lightly floured surface until about 3mm thick. Cut out 12 x 7.5cm rounds and press rounds into holes of tin. Prick bases of each with a fork. Repeat with remaining pastry and refrigerate for 30 mins.

For raspberry coulis, puree raspberries and sugar together until smooth. Strain mixture through a fine sieve into a small bowl and set aside.

Preheat oven to 200C/190C fan-forced. Bake cases for 12 minutes or until lightly golden. Stand cases in tin for 5 mins before transferring to a wire rack to cool.

Fold whipped cream through cooled custard in two batches. Once cases are completely cooled, spoon a small amount of coulis between each. Top with custard. Decorate each tart with raspberries and a dusting of icing sugar if you fancy.


Note: A good raspberry sauce (such as Cuttaway Creek) or jam will work just as well if you don't want to make a coulis.

Recommended baking soundtrack: Horse Feathers - Thistled Spring.

Friday, June 11

chocolate, almond & pear puddings


Isn't it amazing the impact food styling and photography can have on the desire to try a certain recipe? The Indulgence Series from Murdoch Books does both of these things faultlessly. With each new release in this series, I become overwhelmed. Flicking from cover to cover results in sensory overload. I feel guilty picking just one recipe to be the first one I try, but it's never the last. These books are just perfection.

There are few things more comforting to me that eating a hot pudding on a Winter's night. I've been doing this a lot lately, it seems, despite it presently being only the eleventh day of the season. This recipe will bring you all a pudding should on a cold, lazy night. It's quick to mix, quick to bake, and uses ingredients I usually always have handy in my pantry. Would also go wonderfully with a chocolate fudge sauce...


Ingredients (makes 6 individual puddings)
Recipe from Indulgence Chocolate

1/3 cup golden syrup
8 tinned pear halves
60 gms plain flour
30 gms unsweetened cocoa powder
2 tsps baking powder
1 tsp ground allspice
55 gms ground almonds
3 eggs, at room temperature
165 gms brown sugar
60 mls milk
1/3 cup golden syrup, extra, warmed slightly
double cream, to serve

Preheat oven to 180C/170C fan-forced. Grease eight holes of a non-stick giant muffin tin/s, and line the bases of each hole with a round of baking paper. Spoon the golden syrup among the holes to cover the bases. Place a pear half, cut side down, in each.

Sift together the flour, cocoa, baking powder and allspice into a medium sized bowl, then stir in the ground almonds.

Beat the eggs and the sugar with an electric mixer until pale and creamy. Slowly pour in the milk, then add the flour mixture, folding until just combined.

Spoon the pudding mixture over the pears. Bake for 25 minutes or until a skewer inserted into the centre of each cake come out clean. Allow to cool in the tin for 3 minutes before turning out onto a wire rack. Immediately remove the baking paper and transfer the puddings to serving plates. Drizzle with extra golden syrup and serve with a dollop of double cream.


I've kept my leftover puddings in the fridge for a couple of days, and they're still great. I imagine they would also freeze okay, but I doubt it will ever have to come to that.

Recommended baking soundtrack - Wild Nothing - Gemini. 

Sunday, June 6

vanilla rice pudding filled blueberry cakes


When I'm stuck for cupcake ideas, I think of ways I can translate my favourite desserts - puddings, custards, crumbles, pies, tarts - into cupcakes. On this occasion, I had some freshly purchased purple food colouring and was looking for something to compliment the blueberry cupcakes I intended on making. And what goes well with blueberries? Lemons. Yawn. But what's more interesting than lemons?! Rice pudding!

Creamy, sweet rice pudding is complimented so well by fresh, tart berries. I imagine this recipe would taste even better with fresh raspberries.

Ingredients (makes 12)

For rice pudding:
1/4 cup caster sugar
135 gms aborio rice
1 vanilla bean, split and seeds scraped
700ml full-fat milk

For cakes:
90 gms butter, softened
1/2 cup caster sugar
1 tsp vanilla
1 cup self raising flour
2 tbsps milk
2 eggs
1 cup blueberries (fresh, but you can also use frozen)

For cream cheese frosting:
340 gms cream cheese, softened
55 gms butter, softened
4 cups icing sugar, sifted
1/4 tsp vanilla bean paste
small amount of food colouring (I used Wilton's Violet)

1 tbsp icing sugar
fresh blueberries, to decorate (optional)

For the rice pudding, add the milk, rice, vanilla bean and seeds to a non-stick saucepan. Bring to the boil and simmer uncovered for 30-35 minutes, or until creamy and the rice is tender, stirring regularly. Add the sugar and stir for about 2 minutes until dissolved. Place pudding into a small bowl, and refrigerate until needed.

For cakes, preheat oven to 180C/160C fan-forced. Place 12 paper cases into a 12 capacity cupcake tins.

Place all ingredients in the bowl of an electric mixture, and beat until just combined. Increase speed, and beat until mixture is creamy and paler in colour.

Spoon mixture among cases. Sprinkle blueberries evenly among cases, pushing some into cake mixture and leaving some sitting on top. Bake for 20 minutes, until golden. Remove cakes from tin immediately, and allow to cool completely on wire rack.


Once both cakes and rice pudding and cooled completely, take a small sharp knife and - holding your knife at a 45 degree angle - slice a circle into the top of a cake. The circle should be about 5mm from the edge of the cake to make it easy to cover when decorating. By holding your knife at this angle, you are creating a cone-shaped hold in your cake, and the lid you've created should come easily. Set lid aside for later. Repeat with remaining cakes.

Spoon rice pudding into each cake. Replace the lid on each cake. If necessary, trim the pointed end of the lids off to it sits flush when placed back onto the cake.

For frosting, beat cream cheese and butter together in an electric mixer until smooth. Add half of the icing sugar and desired amount of food colouring and again beat until smooth. Gradually add the remaining icing sugar until you get your desired consistency (I use the full amount).

Spoon cream cheese mixture into a large piping bag fitted with plain 1cm tube. Pipe onto cakes.

Decorate cakes with fresh blueberries (if using), and gently dust cakes with icing sugar.

The recipe I've used for the rice pudding will yield a little more than you'll need for 12 cakes, but I certainly wasn't complaining. Feel free to cut quantities if you are crazy and don't wish to have an extra serve or so of pudding sitting in your fridge.


Baking soundtrack: Belle & Sebastian - Tigermilk. 


Tuesday, June 1

gingerbread-spiced macarons


I've tried so, so many macaron recipes - mostly ending in a product that was entirely edible and delicious, but not as handsome as I expected. You can hardly be surprised with the inconsistencies with a traditional macaron recipe: Some recipes call for double sifting icing sugar and almond meal; some don't. Some say to lightly press on the piped mixture with wet fingers; some don't. Most interestingly, some insist the piped mixture rest at room temperature for at least two hours before going into the oven; and some don't. After all of my experimentation, crushed dreams, heartaches and tears, I found my go-to recipe, courtesy of Australian Gourmet Traveller's 2009 French issue. I felt like I had accomplished something in life, albeit a small (but delicious) something.

Since that issue, I've intended on being a little more adventurous with flavours, but I just didn't find the time. This changed when I got my hands on a copy of 'Macaron' by Alison Thompson. This book has me in heaven, and I intend to prolong this sense of the afterlife by trying all 35 recipes. Kind of like Julie Powell, but with less curse words, not as much ambition and with a more lazy and as yet undefined timeframe. We'll see.

First, I bring you gingerbread.

Ingredients (makes 30 macarons, depending on the size)
Recipe taken from 'Macaron' by Alison Thompson

For macaron shells:
225 gms pure icing sugar
140 gms almond meal
110 gms eggs whites, at room temperature
1/2 tsp nutmeg

For filling:
150 gms milk chocolate, chopped
150 mls pouring cream
2 strips orange zest 
1 cinnamon stick
1 star anise
1 clove
2 cardamom pods
pinch of nutmeg
3 tsps honey
1/2 vanilla bean, split and seeds scraped

For filling, melt the chocolate over a double boiler. Pour the cream into a small saucepan and add the orange zest, cinnamon, star anise, clove, cardamom, nutmeg, honey, vanilla pod and seeds. 
Bring to the boil, the remove from heat and stand for 10 mins. Strain the cream, then reheat until hot. Pour it over the chocolate and stir until smooth. 
Refrigerate the filling until firm enough to hold its shape. 

Line two baking trays with baking paper. 
Combine the icing sugar and almond meal, and sift together twice, discarding anything remaining in the sieve. 
In the bowl of an electric mixer, beat the egg whites on a high speed until stiff peaks form. Add a small amount of brown food colouring to egg whites, and mix until colour has evenly spread through mixture. 

Fold the sifted sugar and almond meal into egg whites, continuing to fold until the mixture is glossy and moves slowly when the bowl is tilted. It's not necessary to be too delicate with the egg whites - it's most important that the mixture is nice and smooth. 

Spoon the mixture into a piping bag fitted with a 5mm plain piping tube. Pipe rounds 3cm in diameter onto the baking tray, spacing them 2 - 3cms apart. Sprinkle shells with nutmeg. Tap the trays firmly on the bench a couple of times to knock out any air bubbles. 

The macaron shells must now sit at room temperature until a crust forms - this will take 2 - 6 hours, depending on the temperature of the room (the warmer and drier the room, the faster the drying process will be). When they are ready, you should be able to touch the tops slightly and have no mixture stick to your finger. 

Preheat oven to 150C fan-forced. 

Place macaron shells into the oven and immediately turn the temperature down to 130C. Bake for 10 - 12 mins, until firm to the touch but not coloured. Remove from the oven and allow to cool completely before carefully removing from oven trays. 

Spread or pipe cooled and thickened filling onto half the shells, and sandwich with remaining shells. 

The final product sure is a delicious one. I cooled the ganache for about 4 hours, but it was still only slightly thicker than pouring consistency for me. Next time, I might increase the chocolate ratio to get a thicker and less oozy layer of ganache. 

The most important step is the resting: both this recipe and AGT's call for it - and these are by far the best recipes I've ever tried. For this reason, making macarons just can't be an impulsive decision. Follow the recipe by the letter, and I'm sure you'll be in lust with the results.  


Recommended baking soundtrack - Françoise Hardy - The Vogue Years. Of course!