Monday, December 20

peach melba tart


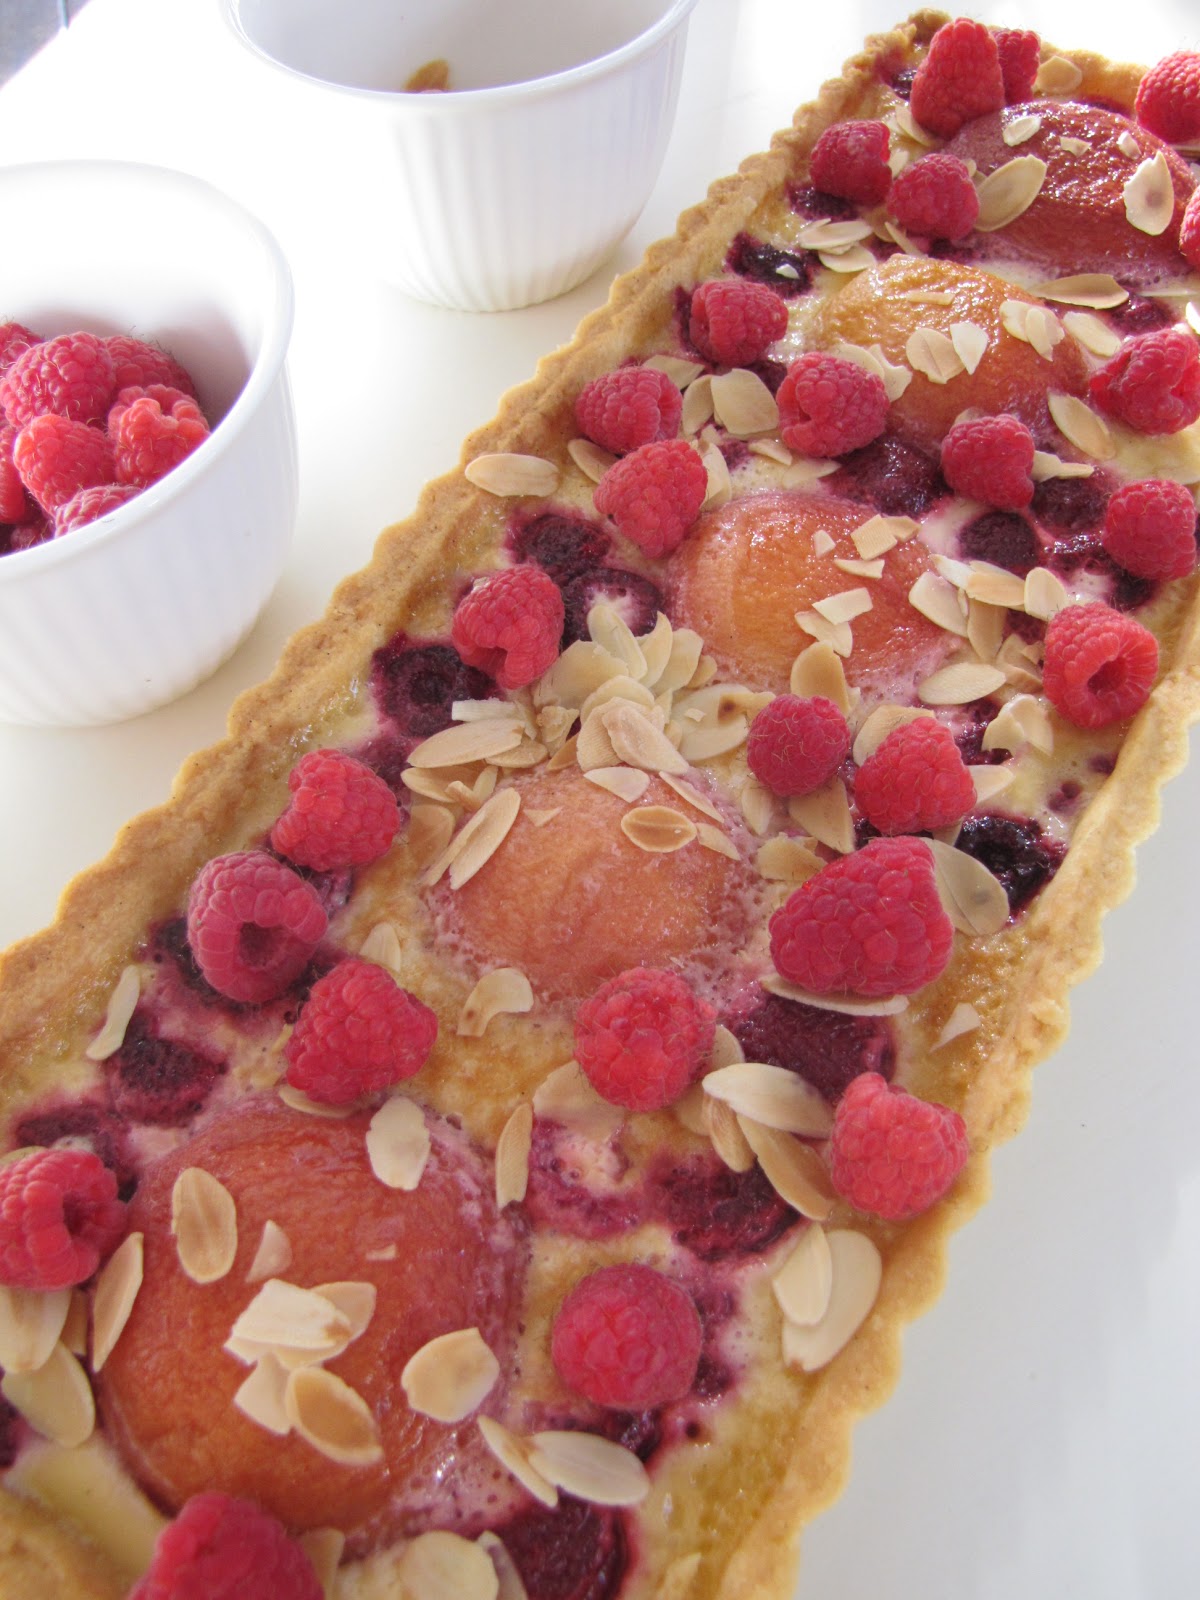
I'm an unashamed Autumn/Winter-person. That doesn't necessarily mean I love extremely cold weather, given a Brisbane Winter hardly reaches below 10C. I do, however, loathe the humidity, squinting, and sunburn that Summer generally involves. As the years pass by, I think I'm becoming more tolerant and can now appreciate more daylight hours. I accept that beautifully thick rhubarb stems are less readily available. I'll even admit that lemon lime & bitters tastes better on a warm Summer's afternoon. But what I really miss during my favourite cooler seasons are raspberries. And peaches. And this Summer, haven't the raspberries been spectacular?

Ingredients (generously serves 6)
Recipe from delicious. More Please

For pastry:
1 2/3 cups plain flour
2 tbsps icing sugar
1 vanilla bean, split, seeds scraped
180 gms chilled unsalted butter, chopped
1 egg yolk

For filling:
3 ripe peaches
200 mls pouring (thin) cream
1 vanilla bean, split, seeds scraped
2 eggs, plus 1 extra yolk
1/4 cup caster sugar
250 gms raspberries

2 tbsps flaked almonds, toasted
icing sugar, to dust


For the pastry, process flour, icing sugar, vanilla seeds and a pinch of salt in a food processor until there are no lumps. Add the butter and process until sandy. Add the yolk and 1 tbsp chilled water, processing until the mixture comes together in a smooth ball. Remove pastry from food processor (kneeding a little if necessary), cover with plastic wrap and chill for 1 hour.

Grease a 12x35cm loose-bottomed tart pan. On a lightly floured surface, roll out the pastry to 3 - 5mm thich and use to line the pan, pressing gently into the base and sides. Trim to fit, then chill for 30mins.

Preheat the oven to 190C. Line pastry with baking paper and fill with pastry weights (or uncooked rice/beans/lentils) and blind bake for ten minutes. Remove weights and baking paper and bake for a further 5 minutes until pastry is golden and dry. Reduce the oven to 170C.

For the filling, blanch the peach halves in a large saucepan of boiling water for 1 minute. Remove, allow to cool slightly, peel, then place on some paper towel and gently pat dry.

Heat the cream and vanilla pod and seeds in a saucepan over medium heat until just below boiling point. Gently whisk the eggs and extra yolk with the sugar in a large heatproof bowl. Slowly whisk the hot cream mixture into the whisked eggs. Remove vanilla pod.

Place the peaches, cut side down, in the tart shell and scatter with half the raspberries. Slowly pour the cream mixture into the tart shell, and bake for 30 - 40mins until the custard is set. Cool slightly, then dust with icing sugar and serve with a scattering of flaked almonds.


I freaked out a little in finding that my tart had set so soon - after about 20 minutes! So please keep a good eye on it during the cooking period to avoid the disappointment of over cooked or even burnt custard. delicious also suggest using Careme vanilla bean sweet shortcrust pastry, as they do quite often throughout this book, and doing so would make this simple recipe even quicker. Sounds good to me!

Recommended baking soundtrack: Thee Oh Sees - Warm Slime. 

Tuesday, December 7

turkish delight macarons


I am by no means a health nut. I like gentle exercises: pilates, yoga, swimming... does strolling count? I do fall off the pilates wagon every once in a while and can go through lengthy periods of times without "exercise", but console my inner couch-potato by reminding myself that I have a fairly physical job. But over the weekend, I felt physically unfit for the first time in as long as I can remember... whilst folding a double batch of macarons. Due to an unintentional baking hiatus, I have lost my ability to hand-whip potatoes, whisk cream and most importantly, fold macaron batter the many times it requires to become beautiful and shiny. I pride myself on this ability. I am thoroughly devastated.

Despite my now sore right arm, these are my favourite macarons of the year, largely due to a new oven. Each are sandwiched with a rose infused, whipped dark chocolate ganache, and contain a small bite of turkish delight in the centre.


Ingredients


For macaron shells:
Recipe courtesy of Bubble and Sweet (based on a Pierre Herme recipe)
150 gms ground almonds
150 gms icing sugar
110 gms egg whites, separated into 2 lots of 55 gms
150 gms white sugar
37 gms water
dash pink food colouring

For ganache:
200 gms good quality dark chocolate, 70% cocoa solids
1/2 cup cream
few drops rosewater
1 - 2 cups icing sugar

About 100 gms turkish delight, chopped into 1cm cubes.

For the macarons, mix the ground almonds and icing sugar together and pulse a few times in food processor to make almond meal finer, being careful not to over-process and release the oil in the almond meal. Sieve into a large bowl. Add colour and 55 gms of the egg whites to the sugar/almond mixture but do not mix in.

Place remaining 55 gms of egg whites in bowl of mixer fitted with the whisk.

Place white sugar and water into saucepan stir to combine and cook without stirring to 118C. Once the mixture reaches 115C start mixing the egg whites on high. Once the sugar syrup reaches 118C remove from heat and immediately pour in a thin stream down the side of the mixer bowl continuing to whisk on high. Continue to whisk the meringue on high until the side of the bowl is only a little warm to touch. The meringue mixture should be beautifully glossy.

Add meringue mixture to almond mixture and using a large spatula fold the mixture together until it starts to shine and forms a ribbon that stays visible for about 30 seconds.

Add the mixture to a piping bag fitted with a plain tip and pipe in lines onto baking trays lined with baking paper. Tap trays on the bench a few times to eliminate any air bubbles.
Set aside for about 30 minutes or until the macarons have formed a skin that doesn't stick to your finger.

Meanwhile preheat oven to 140C . Bake the macaroons for around 13 to 15 minutes depending on size, they should not be browned. Remove the baking trays and immediately slide off the macarons and the baking paper onto the work surface and let cool completely before removing the shells.

For ganache, finely chop chocolate and place in a the bowl of your electric mixer. Place cream and rosewater in a small saucepan, and heat until it just begins to boil. Pour hot cream over the chopped chocolate, cover with a dinner plate (or saucepan lid, or... anything) and leave for 1 minute. Stir mixture until smooth, and allow to cool for ten minutes. Add 1 cup icing sugar to ganache, and whip using paddle attachment until smooth and slightly lighter in colour. Add more icing sugar until desired consistency - the mixture should just be able to hold its shape when piped, but should also be glossy-- about 1 1/2 cups of sugar should do. 

Place whipped ganache in a piping bag fitted with a plain 1cm tip, and pipe half the macaron shells with a dollop of filling. Top with a piece of turkish delight before sandwiching with remaining halves. 


Macarons are apparently better a couple of days after being filled, and prior to this recipe, I can't say I've really had many lying around after that point to really know the difference. I made these in the evening and had my first taste the morning after and could already taste how the flavour had developed and permeated the shell. So, if you can wait that long, fill them and leave them for at least a few hours, or a day if you are really self disciplined. 


Recommended baking soundtrack: Laura Marling - I Speak Because I Can. 

Thursday, December 2

fruit mince brownies


When I saw the December/January issue of delicious displayed in my local newsagent, I felt both utterly elated and sorely disappointed. Elated: the cover is simply gorgeous. Disappointed: I don't have a copy! Elated: So, so many Christmas recipes and gift ideas. Disappointed: If I don't have my copy, and it's already in store, that means my subscription has officially ended. You get the picture.

Of course I bought it straight away, and have since poured over its pages repeatedly since this time last week. I love Christmas desserts that incorporate an element of Christmas cheer into my already favourite sweets. The recipe of last year was Christmas pudding ice cream (again, courtesy of delicious), and this year it's the fruit mince brownie. I plan on making my third batch in a week this coming weekend. I know what you're thinking, but just for the record, I've only had two servings though I could certainly have a lot more.

Ingredients (serves 12 generously)
Recipe courtesy of December/January issue of delicious.

200 gms good quality dark chocolate (70% cocoa solids)
300 gms brown sugar
250 gms unsalted butter
4 eggs, lightly beaten
1 1/3 cups plain flour
1/4 tsp baking powder
1/3 cup cocoa, plus extra for dusting
1/3 cup fruit mince
1 tsp mixed spice
1 cup toasted walnuts, chopped


Preheat the oven to 180C. Grease a 22cm square cake tin and line with baking paper. 

Place chocolate, butter and sugar in a medium saucepan over a low heat, stirring until melted and well combined. Remove from heat and cool slightly. 

Stir in the eggs, followed by all other ingredients and mix until combined. Spread into the tin and bake for 25 minutes until just set. Allow to cool in pan, then dust with cocoa before cutting. 

These are dreamily rich. If you think it will be borderline too rich (what, are you crazy?!), maybe omit the dusting of cocoa. Second time 'round, I upped the quantity of fruit mince, making it closer to 1/2 cup - maybe even more - and they still managed to set fine, but were of course even more moist. You could also increase the amount of mixed spice if you want a truly festive, spicy taste. 

Now I'm dreaming of making fruit mince brownie ice cream! Aaaah!


Recommended baking soundtrack: The 6ths - Hyacinths and Thistles.

Tuesday, November 30

chocolate hazelnut tart


Sometimes, life just gets in the way. I'm into my second week of a new job in a new city. I've reminded myself of how to utilise public transport again after I broke up with buses over ten years ago. I'm also doing surprisingly well navigating the roads without GPS! November certainly was a month of new experiences. And now a mere three hours away from December, I am left with no more excuses. So over the weekend, I finally test drove my 'new' oven.  I think it's the beginning of a good relationship.

In my absence in both baking and blogging, I've still been hoarding recipes - magazines and cookbooks aplenty have been covered in post-it notes and ideas squirreled away for a moment when I finally had time to myself. One book full of many recipes such as these has been delicious' "More Please". Broken into seasons - much like another of my favourite cookbooks from the past year or so - it's overflowing with must-try recipes, both sweet and savoury... And takes a lot of wow factor for me to lust over a savoury recipe. First cab off the rank is this modest hazelnut tart.

My grandmother used to make a delicious peanut & caramel slice which I still often crave - and this tart is like a modern day version of that very slice, with the very welcome addition of dark chocolate. It's simple to make, especially if you are willing to pay a little more and buy the Careme pastry (which is truly delicious). Be aware it does take a while to set post-oven. I ended up chilling mine a little out of impatience.

Ingredients
Recipe from "delicious. More Please"


300 gm packet Careme dark chocolate shortcrust pastry (or see delicious for a basic chocolate pastry recipe)
1 cup thickened cream
60 gms unsalted butter
1/4 cup glucose syrup
1 cup caster sugar
2 1/3 cups hazelnuts, roasted and skins removed
50 gms dark chocolate

Allow pastry to thaw (approximately 1 - 2 hours at room temperature) and then roll out to 5mm thick. Line a 28cm loose-bottomed tart pan with your rolled pastry and chill for 30 minutes. Preheat oven to 180C.

Line the pastry with baking paper, fill with pastry weights or uncooked rice and blind bake for ten minutes. Remove baking paper and bake for a further five minutes until pastry has dried. Leave to cool while you make the filling.

Place the cream and butter in a small saucepan pan over medium heat and bring to just below boiling point. Remove from heat and set aside.
Place the glucose syrup and 1/3 cup water in a medium saucepan, then sprinkle with the sugar. Place over medium heat and cook, stirring occasionally, until the sugar has dissolved and the liquid is clear.
Increase the heat to high and cook, without stirring, until a golden honey colour. Remove from the heat, then carefully whisk the cream mixture into the toffee - it will foam up a little. Return the pan to a low heat and stir to dissolve any hard toffee bits. Add the nuts and cook for a minute. Pour the mixture into the tart shell and bake for about 20 minutes until the tart filling is firm. Remove from the oven and cool before removing from tin.


Just before serving, melt the chocolate and drizzle over the tart.


Recommended baking soundtrack: Andrew Bird - Useless Creatures. 

Thursday, November 11

frangelico tiramisu


The past few weeks have been filled with a birth, a death, a job offer, a subsequent resignation from a six-year long job, and now packing for a move. To say I have felt overwhelmed would be an understatement. I am not one who handles change very well as it always seems to sneak up on me, violently arriving, slapping me around. I wouldn't say I'm resistant to change, but that I like to be able to anticipate it, be prepared for it - even if that preparation is merely mental. It doesn't really make any sense, but having the time to think about what's coming tricks me into believing I am then, as a result of pondering, ready and able. There are few things that console me when I'm freaking out, but routine is one of them. So how can I get a sense of routine when my whole world is blurring past at a frantic pace? I can bake.

I recently got a copy of Nigella Lawson's Kitchen, but up until yesterday, hadn't even opened it's pages. This is not like me. So flicking through it yesterday in an attempt to console myself, I found a recipe that was absolutely perfect for mood, my busy schedule, and my small amount of kitchen supplies that haven't found it's way to a taped-up box. Tiramisu. A booooozy tiramisu.


This recipe really is a breeze, barely involving any effort at all. Aside from the six hour rest period, it took me about ten minutes to make. This, in combination with my usual skepticism about tiramisu, I wasn't so certain the result would be anything but ordinary - but I was pleasantly surprised. The espresso flavour (though made slightly weaker than suggested due to a low supply of coffee!) is made even more rich by a whole cup of Frangelico. So if you do have this liqueur sitting in a cabinet, like I did, it's a great way to use it up quite quickly.

Ingredients (serves 12, or fills a 24cm square dish)
Recipe from Nigella Lawson's 'Kitchen'

250 mls espresso coffee (or 8 tsp of good quality espresso powder dissolved in 250 mls boiling water)
250 mls Frangelico hazelnut liqueur
30 (about about 375 gms) savoiardi biscuits (approximately)

2 eggs, separated
75 gms caster sugar
500 gms mascarpone
60 mls Frangelico (extra)
100 gms chopped roasted and skinned hazelnuts
3 tsp cocoa powder

Combine the coffee and 250 mls Frangelico in a jug, stir to combine and allow to cool slightly.

Beat the egg whites until frothy. In a separate bowl, beat the yolks, sugar and extra 60 mls Frangelico until sugar dissolves. Add the mascarpone, beating well to combine. Then, fold the egg whites into mascarpone mixture, mixing until well combined.

Pour half the coffee-liqueur mixture into a shallow bowl. Dunk enough biscuits to cover the bottom of your dish in the mixture - ensure they absorb some liquid but beware they will fall apart quite quickly! Pour any leftover liquid over biscuit layer.

Put half the mascarpone mixture on top of the soaked biscuit layer and spread evenly.

Pour the remaining coffee-liqueur mixture into the shallow bowl and make another, final layer of biscuits, dipping as before and layering on top of the mascarpone in your dish. Again, pour any remaining liquid over the biscuit layer, and cover with the final layer of mascarpone mixture.

Cover with plastic wrap and refrigerate for at least 6 hours, or overnight.

When ready to serve, mix the chopped hazelnuts with 2 tsp cocoa. Sprinkle over your tiramisu, then dust with a final tsp of cocoa powder, pushing it through a sieve for lighter coverage over, as Nigella puts it, the "nut-rubbly tiramisu". She has such a way with words.


Nigella helpfully adds that this can be kept refrigerated for up to four days in total. Alternatively, it can be kept in the freezer sans hazelnut-cocoa mix within a layer of plastic wrap and foil for up to three months! It can then be defrosted in the fridge overnight. This would be such a good idea if I had freezer space...

This is definitely a recipe I will come back to, much to the delight of my better half. It's smooth and rich, and the booze hits quite hard, in a good way. It is handy to have the liqueur laying around as I did, however, as I imagine a regular introduction of this dish would also bring a decent dent in my hip pocket. The frothy egg whites also add a particular lightness to it, which I think it really needs.


Recommended baking soundtrack: Belle & Sebastian - Write About Love. 

Tuesday, October 26

honey & buttermilk panna cotta


As much as I love cookbooks, I adore cooking magazines - my absolute favourites being delicious, Australian Gourmet Traveller (if you hadn't already noticed), and Donna Hay. Having a collection of your own personal cookbooks is obviously a necessity, but there's just something about receiving a new, shiny collection of seasonal recipes every month that gets me excited like a five year old on Christmas morning. My boyfriend usually checks the mail, and after he hand delivers me a copy of my newly arrived subscription, my reading ritual is to rip the packet open and immediately flick through the pages, just once through. I "oooh" and I "aaaah" out loud, but then put it down. It's not until I have a cup of tea, and at least half an hour to myself that I sit down and pour over the recipes. Admittedly, some issues appeal to me more thank others, but there is always one or two recipes that simply scream "COOK ME, EAT ME!". In the October/November issue of Donna Hay, the recipes in the entire magazine were all fighting for my attentions.

Out of all of the Summery recipes, Donna Hay's recipe for honey & buttermilk panna cotta has won my heart for the most immediately appealing recipe, which brings me to my third honey recipe for the week. It is so incredibly simple and quick, perfect for a weeknight dessert. Or an any-night dessert, in fact. Just remember to factor in setting time, which is really quite quick.


I dedicate this post to my dear friend Chris as, for some unexplainable reason, panna cottas always remind me of him. So Chris: Get you blog up and running already, forgoodnesssake!


Ingredients (makes 4)
Recipe from Donna Hay

1 tsp gelatine powder
2 tbsps water
1 cup buttermilk
1 cup pouring cream
1/2 cup icing sugar
1 vanilla bean, split and seeds scraped
1 tbsp honey

Sprinkle gelatine over water in a bowl, then stir to combine. Set aside for 5 minutes until the gelatine is absorbed.

Place the buttermilk, cream, sugar and vanilla bean and seeds in a small saucepan over medium heat, and stir until the sugar has dissolved. Add the gelatine and cook, stirring for 2 - 3 minutes until the gelatine has dissolved. Strain and allow to cool completely.

Place 1 tsp honey in the bases of four 1/2 cup capacity glasses. Pour over the cooled cream mixture and refrigerate for at least two hours until set.

I love the texture buttermilk gives to cakes, but this was the first instance I'd used the gorgeous ingredient for anything unbaked. In this instance, it's perfect - the sticky sweetness of the honey lingering at the bottom of the glass is broken up perfectly by the tartness of the buttermilk.

As I previously mentioned, this is really quick recipe to whip up, which makes the final product even sweeter.


Recommended baking soundtrack: Horse Feathers - House With No Home.  

Sunday, October 24

lady grey & honey madeleines


Trying to think of another soft, delicate recipe to take advantage of my current honey obsession, madeleines sprung to mind instantly, and of course they did-- Dainty and light as a feather, madeleines and honey are a perfect match. To make me even happier, I stumbled across a recipe that throws my absolute favourite black tea blend - lady grey - into the mix. I was in heaven.

This recipe is quick and easy, even taking into consideration the recipe's insistence that the mixture needs  time to rest in the fridge for a few hours. It's still so simple to quickly whip up the batter, leave it in the fridge and slide then into the oven for mere minutes as your guests are arriving (or your stomach is rumbling). Your house will also smell absolutely beautiful. 

Ingredients (makes 12 - 16)
Recipe adapted from telegraph.co.uk

70 gms unsalted butter
2 tbsps loose Lady Grey tea, or contents of 2 tea bags
100 gms plain flour
½ tsp baking powder
pinch of sea salt
2 eggs
70 gms caster sugar
2 tbsps honey
1 tsp vanilla extract
½ tsp grated orange zest


Melt the butter in a small saucepan over a low heat, then mix in the tea leaves, swirling to disperse them. Leave for ten minutes to infuse, then pour through a tea strainer. Squish the tea leaves right into the strainer to get as much butter (and flavour!) out of them as possible.

Sift together the flour, baking powder and salt. In the bowl of an electric mixer (with whisk attachment if possible), beat the eggs and sugar together until thick, light and fluffy. Add the honey, vanilla and orange zest and beat for a further minute. Gently fold in the dry ingredients by hand, followed by the tea-flavoured butter. Cover the surface with plastic wrap refrigerate for at least two hours or up to a day. This is essential to allow the flavours to develop.

Preheat the oven to 200C. Thoroughly grease a 12 capacity madeleine tin with either melted butter or cooking spray. Drop about one tablespoon of batter into each mould, not worrying about smoothing the tops as it will spread out during baking. The mixture made 16 madeleines for me, and is fine to be left at room temperature while your first batch bakes if you don't have two tins. Place on the middle shelf of the oven and bake until the madeleines are golden. This will take about ten minutes, but keep a close eye on them, as they brown quickly! Test them with a skewer if necessary to ensure they're ready.

Quickly tap the madeleine tin on the work surface to loosen the cakes before turning them on to a wire rack to cool slightly. Dust with icing sugar to serve, if you can wait that long. 


You can really - not surprisingly by the smell of my house - taste the lady grey tea, albeit a beautiful subtle flavour. I've made some pretty fine madeleines in my time (including a spicy chocolate variety with accompanying dipping sauce) but this is surely the finest. This flavour could not possibly be any more perfect for Spring. 

Recommended baking soundtrack: Best Coast - Crazy For You

Thursday, October 21

oh, honey cupcakes with marshmallow icing


Lately, wherever I look I seem to find dreamy, honey inspired sweets. Naomi from hello naomi recently created an absolutely stunning bee hive cake. Linda from Bubble and Sweet made some busy bee cookies, topped with wonderful little bumble bees. And now, Donna Hay's October/November issue is filled with honey inspired desserts, including cookies, panna cotta and bundt cakes. I want in on this action.

I've used a beautiful honey cake recipe to make cupcakes topped with a fluffy, light vanilla marshmallow frosting. I credit my bees to Linda at Bubble and Sweet, though hers are much more inspirational! Don't be put off by the extra work - they are fiddly but so simple, and add so much to the otherwise rather plain looking cupcake.

Ingredients (makes 15)
For cakes:
200 gms unsalted butter, softened
185 gms soft brown sugar
3 eggs
1/3 cup honey, warmed
280 gms self raising flour

For icing:
3 egg whites
1 1/2 cups white sugar
2 tsps glucose syrup
pinch of cream of tartar
1 tsp vanilla bean paste
dash of yellow food colouring

For decorating:
200 gms fondant
yellow food colouring
black food colouring


For the cakes, preheat your oven to 180C. Line two standard muffin tins with 15 paper cases.
Beat the butter and brown sugar until light and cream. Add eggs, one at a time, and beat well after each addition. Fold in the honey and flour until combined. The mixture should be beautiful and creamy.

Divide the mixture among 15 cases and bake for 20 minutes until lightly golden. Transfer to a wire rack immediately and cool completely.

Meanwhile, for your bumble bees, tint roughly 180 gms of fondant yellow to make the bee-bodies. Roll small balls into oval shapes at your desired size. My bees are about 1 - 1.5 cms and this quantity of fondant made about 30 bees. Using either a fine paintbrush or a toothpick, paint stripes, eyes and a smiling mouth on each of your bees. Allow to dry. Using the remaining uncoloured fondant, squish small amounts to form wing shapes. Press two wings onto each bee, using a little water to secure if necessary. Set bees aside to dry and firm up slightly.

The make the marshmallow icing, combine the egg whites, sugar, corn syrup, cream of tartar and 100 mls water in a heatproof bowl (preferably the bowl of your electric mixer to save on washing up). Sit the bowl over a saucepan of simmering water, and whisk quite vigorously for five minutes until mixture is light and foamy. Alternatively, if you you have handheld beaters, you could use these - it will save you time and sweat! Remove from heat. Add vanilla and beat with electric mixers on a high speed until stiff peaks form. Add the food colouring until the desired strength of yellow and beat until just combined.

Generously pipe fluffy icing onto each cake using a plain 1cm tip. Top with a bumble bee. I find it better to secure bees with a toothpick, pierced through the the cake, but this is not necessary.

These cakes were a huge hit at work today, with all 16 being scooped up before I left for the night. Perhaps next time I'll fill them with creamed honey, or even a honey infused custard. Custard makes everything better.


Stay tuned for more honey inspired recipes over the weekend!

Recommended baking soundtrack: Ola Podrida - Belly of the Lion.  

Monday, October 11

strawberry meringue layer cake: a lesson in small failures


A quick post and a quick recipe! Recently, I've been purchasing too many strawberries. Now, I am a huge strawberry enthusiast - they're surely one of the most aesthetically adorable fruits; they're great fresh, frozen and pureed; and are delicious in desserts, salads or eaten straight from the punnet. For me to say I have gone overboard means I have really bought too many for even me to consume and enjoy. So when myself and two of my closest friends went to visit the other member of our quartet who had recently come out of hospital, it was a great excuse to bring a cake to use up some of my strawberry supply.

As I mentioned, this cake is so easy and delicious. Who would have thought it was possible to layer sponge batter and meringue in the same tin to make what I like to call a macaron cake. It's obviously not like a macaron, but the way the sponge form a foot to a puffy, golden meringue top reminded me of the satisfaction of pulling a good batch of macarons from the oven.

Two of these beautifully light cakes sandwiched with Chantilly cream and an abundance of fresh strawberries was a huge hit, and hopefully lifted the spirits of our patient.

Ingredients
Recipe from Forever Summer by Nigella Lawson

For cake:
125 gms plain flour
25 gms cornflour
a 1/2 tsps baking powder
100 gms unsalted butter, softened
300 gms caster sugar
4 eggs, separated
50 gms flaked almonds
2 tbsps milk
2 tsps vanilla bean paste

For filling:
375 mls double cream
1/4 cup icing sugar
1 tsp vanilla bean paste
250 gms strawberries

Preheat the oven to 200C. Line, butter and flour 2 x 22cm spring form tins. 

Weigh out the flour, cornflour and baking powder into a bowl. Cream the butter and 100 gms of the sugar in the bowl of an electric mixer until pale and creamy. Add the egg yolks and beat until combined. Gently fold in the dry ingredients, add the vanilla, and stir through the milk to thin the batter. Divide the mixture evenly among the two prepared tins. 

Whisk the egg whites until soft peaks form, and then gradually add the remaining caster sugar. Spread a layer of meringue over the top of the sponge batter in both tins. Sprinkle almonds evenly over tops. Bake  for 30 - 35 minutes, until the tops of each have puffed and the almonds are golden. Let the cakes cool in their tins.

Whip the double cream with vanilla and icing sugar until smooth. Sandwich your cake generously with cream and strawberries. 


Now, I should mention that I loathe my oven. Yes, it's a bit of an excuse to blame your oven for imperfections (a workman never blames his tools etc.), but I have tried very hard to work with its weaknesses and this effort is often the source of many frustrations. This cake was no exception - I burnt some of the almonds and areas of the sponge's crust :( And only after about 15 minutes of cooking time! So, be aware of a potential shorter cooking time if your relationship with your oven is anything like mine. But with time, I have been able to realise that one of the best things about baking - despite my high standards sometimes being crippling to my ego - is that the results are always edible and enjoyed by all. Even me. 

Recommended baking soundtrack: Broken Social Scene - You Forgot It in People.

Monday, October 4

homemade wagon wheels


As I type this, I'm seeing the first peak of sunshine we've had in four days. I was lucky enough to have a rare three day weekend to myself after a very busy couple of months, and I only had one thing planned: nothing. The rain was a nice companion to stop me from feeling guilty to stay inside, but was also a motivator to bake some cookies. "I'm going to bake some cookies", I say to my lovely boyfriend. "Oh yessssss!", he replies. You see, I never bake cookies. Well, rarely ever.

After flicking through books and magazines all morning, I had a break with a cup of tea, read some food blogs, and of course stumbled on tartelette's blog, which is a common time waster for me. Here, after trawling through many pages, I found some chocolate covered marshmallows, a recipe that came from a daring baker's challenge. What really got me excited was the pairing of chocolate, marshmallows and PEANUT BUTTER! However, I decided to stick to something familiar - raspberry jam - in an attempt to recreate and improve on one of our favourite cookies: the wagon wheel. My version is a little chubbier, and therefore more tasty. Of course!

Rather than use tartelette's cookie recipe, I've used my favourite shortbread cookie recipe. You could even do a nice chocolate butter cookie.


Ingredients
Recipe adapted from tartlette

For the cookies:
250 gms unsalted butter, softened
1 cup pure icing sugar, sifted
330 gms plain flour
1/4 cup cornflour
1 egg white, lightly beaten, for brushing

For the marshmallows:
1/4 cup water
1/4 cup glucose syrup
3/4 cup white sugar
1 tbsp powdered gelatin
2 tbsps cold water
2 egg whites, room temperature
2 tsps vanilla bean paste

For the chocolate glaze:
340 gms dark chocolate
vegetable oil

For the cookies, beat butter and icing sugar with an electric mixer until pale and creamy. Scrape down the sides of the bowl, and add flour and cornflour, stirring until a soft dough forms. Turn onto a lightly floured surface, knead until just smooth and form into a disc. Cover with glad wrap and refrigerate for 30 minutes.

Preheat oven to 160C. Roll out shortbread on a lightly floured surface until 5mm thick. Cut 4.5cm diameter rounds and place on baking trays lined with baking paper. Refrigerate until firm, then prick cookies with a fork and brush lightly with egg white. Bake for 8 - 10 minutes until cookies are lightly golden, remove from oven and cool completely on trays before moving to a wire rack. Dollop a small amount of raspberry jam in the centre of each cookie (about 1/4 tsp).

In a medium saucepan, combine the water, corn syrup, and sugar, bring to a boil until it reaches soft-ball stage, or 115C on a candy thermometer. Sprinkle the gelatin over the cold water and let dissolve. Remove the syrup from the heat, add the gelatin, and mix. Whisk the whites with an electric mixer until soft peaks form and pour the syrup into the whites. Add the vanilla bean paste and continue whipping until stiff. Transfer to a pastry bag. Pipe marshmallow onto each cookie, then allow to sit at room temperature for 1 - 2 hours. You want to marshmallow to begin to set, which will make it easier to coat in chocolate glaze.

Melt the chocolate and 1/4 cup vegetable oil together in a bowl over a saucepan of simmering water. Add more oil as needed until glaze is as runny as desired. I lost count at how much I used, but am guessing it was about 1/2 cup. Adding too much runs the risk of the glaze sliding off your marshmallow peaks, not to mention your chocolate tasting oily, so add gradually and with cautio. Allow to cool for 10 - 15 mins.

Line a tray with baking paper. One at a time, gently drop the marshmallow-topped cookies into the warm chocolate glaze. Lift out with a fork and let excess chocolate drip back into the bowl. Place on the prepared trayand let set at room temperature until the coating is firm, about 1 to 2 hours.


I was admittedly very nervous fully submerging the marshmallow topped cookies into the still warm chocolate, but they're very resilient! I was impatient and set mine in the fridge, as you can see by their frosty exterior, but I liked the choolate with a bit of crack. I will definitely be doing some more experimenting with this lovely recipe in the near future.

Recommended baking soundtrack: Fresh & Onlys - Play It Strange (this album is so, so good). 

Friday, October 1

congratulations madelyn & brad


Last weekend, I had the pleasure of being a bridesmaid and a baker for one of my dearest friends - Madelyn - on her special day. I've known and adored Madelyn for over ten years, so I felt truly lucky that I could contribute to her and Brad's wedding day. Her only request was for the cupcakes to be based on a batch that I made for her birthday the previous year, which were baked with inspiration from her all-time favourite sweet - caramel slice. And for there to be eighty of them.


The original cakes were a simple caramel mudcake, filled with caramel fudge sauce and topped with rich ganache. I did, however, have doubts at how these would look on a cupcake tower in the middle of a formal dining room.


I've baked for large formal occasions and weddings before, but baking for a close friend for their wedding brings a little more pressure than I expected. I knew she would be happy with whatever I chose to do (and she really did leave the decorating up to me!), but I really wanted these cakes to be as special as the couple Madelyn and Brad are. If you knew them, you'd understand, though I think this might be a common feeling with the marriage of friends.

So, I subtly tweaked the appearance of the cakes to make them look a little more classic-- this is always easy enough to do with a whipped (chocolate) butter cream piped on each cake. I also stamped some fondant with the happy couple's initials and topped each cake with either a 'B' or an 'H'. This was a really simple but classy way of adding the colour of our bridesmaids dresses and the accent colour of the room into the dessert.


This is also reflected in the tiered caramel mudcake that sat atop the cupcake stand for Madelyn & Brad to cut.


It was an absolutely beautiful day. Again, congratulations Madelyn & Brad. Everyone who knows you loves you even more as a married couple xo

Sunday, September 26

salted peanut & caramel ice cream with hot fudge sauce


There is a serious gap in the recipe-market for good, dark chocolate sauces. Ganache has its place in my heart and in desserts, but it's just no substitute for a good rich and fudgey sauce. I've tried many, from multiple sources: they may have been rich, but by no means thick, gooey and fudgey. And then at last, I found it, thanks once again to Australian Gourmet Traveller. And it was then that I discovered the secret ingredients to a good chocolate fudge: liquid glucose, and cooking time long enough for the ingredients to emulsify.

I've also neglected my beautiful ice cream maker for far too long. What better excuse could I possibly have to make fudge sauce than a need to dust off the ol' ice cream machine.


So here is the simple recipe, accompanied by another for a fantastic recipe for salted peanut ice cream. This combination, says my better half, is snickers in ice cream form. I think it's better.

Ingredients
Recipe from Australian Gourmet Traveller

For ice cream:
180 gms raw unsalted peanuts
290 gms caster sugar
900 mls pouring cream
60 gms butter, chopped
8 egg yolks
200 mls milk
1 vanilla bean, split and seeds scraped

For fudge sauce:
65 gms dark chocolate, chopped
10 gms unsalted butter
75 gms caster sugar
70 gms liquid glucose
2 tsps cocoa powder

For the ice cream, preheat oven to 180C. Place peanuts on a baking tray, roast until golden and fragrant  then rub between a tea towel to remove skins. Coarsely chop and set aside.

Combine 140 gms of sugar and 50 mls water in a saucepan, stir over medium-high heat until sugar dissolves, bring to the boil and cook until dark caramel in colour. Remove from heat, carefully add 100 mls cream, butter and 1 tsp sea salt and stir to combine. Return to heat, cook until smooth and then cool to room temperature. Stir in 40 gms roasted peanuts.

Meanwhile, whisk yolks and remaining sugar in a heatproof bowl until thick and pale. Bring milk, vanilla bean and seeds, remaining cream and remaining roasted peanuts to the boil in a large saucepan, then pour over egg mixture, whisking to combine. Return to pan, stir continuously over medium heat until mixture coats the back of a wooden spoon thickly. Strain into a bowl placed over ice, discarding any solids. Cool completely, then freeze in an ice-cream machine. Fold through salted peanut-caramel to form a ripple effect and freeze until firm. Try to chose a container that's as close to the capacity of ice cream you've made as possible - the more airspace you have in the container, the more likely ice crystals will form. - this recipe makes about 1.2 litres.


Melt chocolate and butter in a heatproof bowl placed over a saucepan of simmering water, stirring occasionally until smooth and combined. Combine remaining ingredients and 80 mls water in a saucepan and bring to the boil, then add chocolate mixture. Return to the boil and cook over high heat without stirring, shaking pan to dissolve lumps until well emulsified. Set aside and keep warm until ready to serve.


This sauce does get better with age, though I haven't been able to experiment to determine exactly how long it lasts. It also reheats splendidly on the stove or in the microwave. It does this marvelous thing when it hits the cold ice cream where it begins to harden again, becoming a little chewy, which is just amazing. A winner of my heart.

Recommended baking soundtrack: Real Estate - Reality


Tuesday, September 14

mint chocolate tarts


To say that I love the combination of mint and chocolate would be an understatement, a love my sister and I have always shared. I adore mint slice biscuits, but something is... missing with them. I eat them in enjoyment, but could never put my finger on why I was always a little disappointed, or what I would change about them.

I have also, more recently, fallen in love with Christine Adams, responsible for the wonderful desserts at Neil Perry's Rockpool restaurants. This is mostly due to her six page dessert spread in this months Australian Gourmet Traveller, but also because she has helped me find the elusive something missing from mint slice. Ooziness. Simply put, they're not generous enough. Mint slice give you the flavour, but not in the quantity I need. I want oozy but still slightly firm mint. I want a thicker coating of soft dark chocolate. This tart, my friends, is all of these things and more, and it's such a well written and simple recipe.


Ingredients (makes 6 small, or 12 slightly smaller)
Recipe adapted from September issue of Australian Gourmet Traveller


For pastry:
200 gms unsalted butter, softened
140 gms pure icing sugar, sifted
1 egg yolk
3/4 tsp vanilla extract
200 gms plain flour
30 gms Dutch-processed cocoa

For mint fondant:
200 gms fondant, coarsely chopped, softened
10 mint leaves
3 - 4 drops mint oil or extract

For ganache:
70 gms softened butter
285 gms Valrhona Guanaja (or the best quality 70% cocoa solid you can afford) chocolate, finely chopped
310 mls pouring cream

For the pastry, preheat oven to 180C. Beat butter and sugar in an electric mixer until pale and creamy (4 minutes). Add yolk and vanilla and mix until combined. Sift flour and cocoa together, add to butter mixture and mix until just combined. Turn onto a lightly floured surface, then knead lightly to combine and form into a disc. Wrap in plastic wrap and refrigerate until chilled (1-2 hours).

Divide mixture into 6 or 12, depending on size of tart tins you're using, then roll out each piece on a lightly floured bench to 3-4mm-thick and line twelve 6cm or six 9cm tartlet cases sprayed with non-stick cooking spray. Trim edges, refrigerate until chilled, then prick bases and blind bake until set (10-12 minutes). Remove paper and weights and bake until for 8 - 10 minutes, until pastry is cooked on the base. Cool on a wire rack, then remove tart tins.


For mint fondant, process fondant and mint in a food processor until smooth. Transfer to a heatproof bowl, cover with foil and melt over a saucepan of simmering water. Remove from heat, add 1-1½ tsp water to thin to pouring consistency, then add mint oil drop by drop to taste. Divide among tart cases and stand at room temperature until set.


For ganache, beat butter in a bowl with a spatula until soft and creamy. Place chocolate in a heatproof bowl and set aside. Bring cream to the boil in a small saucepan and pour over chocolate. Stand for a minute, then stir slowly with a spatula until melted and smooth. Add butter a little at a time, stirring gently until incorporated, then pour into tart cases over fondant. Stand for about an hour or until chocolate has set.


The result is simply beautiful-- it's so nice to get a fleck of fresh mint in the fondant, and the soft just set shiny-ganache is beautiful with the crispy shell. Keep in mind the strength of the mint has to compete with the double chocolate, so I made it quite strong for this reason, which I was very happy with. I just adore everything about this recipe, and imagine it becoming a regular rotation in my sweets schedule. I do have to share it with my sister, after all. 

Recommended baking soundtrack: BenoƮt Pioulard - Temper.

Sunday, September 12

chouquette: a review


I don't usually do reviews. I feel somewhat uncomfortable about taking photos in restaurants - mostly due to my camera being so old, me never deleting photos, and the reload speed unbearable as a result of both! - and I also have a terribly sparse and sporadic memory, so by the time I sit down to write my experiences, the finer details are a little faded. Also, how many synonyms for "lovely" could there possibly be? 

It's been a while since I've blogged, but not baked. I seem to have many excuses, including working on and  submitting assessments coming close to 25 000 words and baking for and hosting my sister's baby shower. So today when my better half and I headed to New Farm to visit Chouquette, I figured now is as a good time to come back into orbit of the blogosphere. Ugh, I hate that word. A dear friend and coworker of mine recommended this tiny, character-riddled patisserie months back, but I've just never found the time or opportunity to visit. It took Australian Gourmet Traveller to mention in its 2011 Australian Restaurant Guide for me to make it a priority. 


We arrived around 10:30am to find this little cafe bustling, all seats taken, and very shortly a line out the door after us. We were served by friendly, efficient and patient staff, and each chose two treats, which was hard only because of the variety and quality on display. We then ducked off to New Farm park to enjoy the morning and our bounty of goods. My first course: a macaron. Of course. 

Chocolate macaron - $2.70

I should have placed this baby next a 50c piece to show its size - it was huge! More importantly, it was delicious - slightly crispy, chocolatey and chewy. Despite sharing a little, what impressed me most was my ability to eat it all. It wasn't sickly sweet like macarons can be. 

Tarte au chocolat & Tarte au citron - $6 each


After a break, a walk and a coffee, we went halves in a tarte au citron and tarte au chocolat. The pastry on each was beautiful and crispy. The lemon tart was rich and eggy, and the chocolate ganache filling was velvety smooth. Despite my boyfriend's resistance to eating aluminium foil ("It's silver leaf!", I tell him through laughter), we were both in heaven. 

I will definitely be back to Chouquette, but will plan to arrive a little during weekends. I appreciate and admire cafes and restaurants that cook a batch and simply sell out if there's high demand, rather than churning out a product en masse and have an abundance of stock in cabinets. It makes you appreciate acquiring something special. My macaroon left two lonely ones behind, and they were all out of chocolate eclairs, so if you're after something in particular best get there early. 

19 Barker St New Farm QLD 4005
07 3358 6336

Wednesday to Saturday - 6.30am to 5.00pm
Sunday - 6.30am to 12.30pm